Introduction
Finding a puddle of water under your Whirlpool refrigerator can be alarming. Not only is it a potential hazard (slippery floors!), but it also indicates that something isn’t working correctly. This leak isn’t just inconvenient; it can lead to water damage on your floors and increased energy bills if your refrigerator is working harder to maintain its temperature. It’s a problem best tackled sooner rather than later to prevent more costly repairs down the road. Don’t panic! Many leaks are due to simple issues you can resolve yourself.
Common Causes of Whirlpool Refrigerator is Leaking Water Underneath
Here are some of the most common reasons why your Whirlpool refrigerator might be leaking water:
- Clogged Defrost Drain: This is the most frequent culprit. The defrost drain carries water from the defrost cycle to a pan under the fridge where it evaporates. When clogged, water backs up and overflows.
- Frozen Defrost Drain: If the defrost drain freezes, the water can’t drain away and ends up leaking inside, eventually dripping to the floor.
- Faulty Defrost System: Problems with the defrost heater or defrost timer can cause excessive ice buildup, leading to more water than the drain can handle.
- Cracked or Damaged Drain Pan: The drain pan itself, located beneath the refrigerator, might be cracked or damaged, causing the collected water to leak.
- Loose or Disconnected Water Line: If your refrigerator has an ice maker or water dispenser, a loose or disconnected water line is a prime suspect.
- High Humidity: In very humid environments, condensation can form on the outside of the refrigerator and drip down, mimicking a leak.
- Overfilled Ice Maker: An overfilling ice maker can overflow, especially if the water pressure is too high.
- Door Seals Not Sealing Properly: If the door seals are damaged or dirty, warm air can enter the refrigerator, causing condensation and contributing to leaks.
Symptoms Checklist
Use this checklist to help you diagnose the source of the leak:
- Puddle of water directly beneath the refrigerator.
- Water accumulating inside the refrigerator, often at the bottom.
- Ice buildup inside the freezer.
- Visible frost or ice around the defrost drain opening.
- Increased humidity inside the refrigerator.
- Refrigerator running more frequently than usual.
- Ice maker malfunctioning or overflowing.
How to Fix Whirlpool Refrigerator is Leaking Water Underneath Step-by-Step Guide
Follow these steps to troubleshoot and fix your leaking refrigerator:
- Unplug the Refrigerator: Safety first! Disconnect the refrigerator from the power outlet before beginning any inspection or repair.
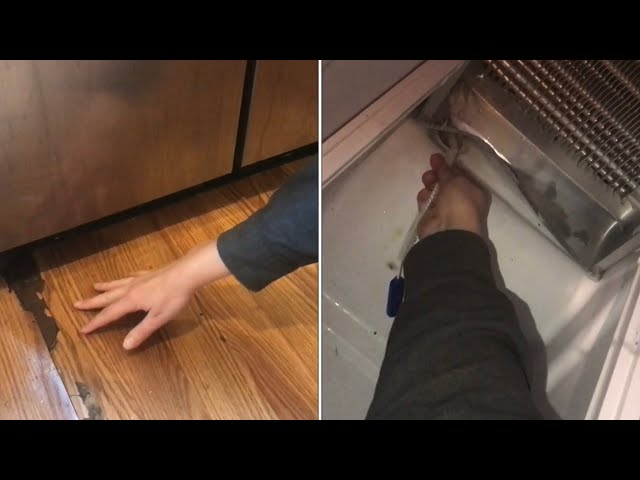
- Locate the Defrost Drain: This is usually located on the back wall inside the freezer compartment, often behind a panel. Consult your refrigerator’s manual if needed.
- Check for Ice Buildup: Examine the defrost drain area for excessive ice. If there is a lot of ice, try melting it with a hairdryer on a low setting. Be careful not to melt any plastic components.
- Clear the Defrost Drain: Once the ice is melted, use a thin, flexible object like a pipe cleaner, a straightened coat hanger, or a turkey baster filled with warm water to flush out the drain.
- Flush the Drain with Warm Water: After clearing the initial blockage, pour a cup of warm water down the drain to ensure it’s completely clear.
- Inspect the Drain Pan: Locate the drain pan beneath the refrigerator. Carefully pull it out and inspect it for cracks or damage. Empty any water that may be present.
- Check Water Lines (If Applicable): If your refrigerator has an ice maker or water dispenser, inspect the water lines for leaks or loose connections. Tighten any loose fittings.
- Inspect Door Seals: Check the refrigerator and freezer door seals for damage, cracks, or debris. Clean the seals with a damp cloth to ensure a good seal.
- Level the Refrigerator: Ensure the refrigerator is level. Use a level to check the top of the refrigerator and adjust the leveling feet as needed. A slight tilt backward can help water drain properly.
- Monitor the Refrigerator: Plug the refrigerator back in and monitor it for a few days to see if the leak has stopped.
- If the Leak Persists: If the leak continues, consider checking the defrost heater and timer. These components are more complex and may require professional assistance.
- Check Water Filter Housing(If Applicable):If your refrigerator has a water filter, check the housing and filter itself for cracks or improper seating. Ensure the filter is correctly installed.
Fix the Issue Without Buying Parts
Before you start buying replacement parts, try these free and easy methods:
- Reset the Refrigerator: Unplug the refrigerator for 30 minutes to reset the system. This can sometimes resolve minor electrical glitches.
- Clean the Condenser Coils: Located on the back or bottom of the refrigerator, dirty condenser coils can reduce efficiency and contribute to condensation. Clean them with a vacuum cleaner brush attachment.
- Ensure Proper Ventilation: Make sure the refrigerator has adequate space around it for proper ventilation. Overcrowding can lead to overheating and condensation.
- Inspect for Blockages: Check inside the refrigerator for items blocking vents, especially in the freezer. Proper airflow is crucial for temperature regulation and preventing ice buildup.
When Replacement Might Be Necessary
If you’ve tried all the troubleshooting steps and the leak persists, replacement of certain parts might be necessary. Here are some common culprits and estimated costs (USD):
- Defrost Heater: $50 – $100
- Defrost Timer: $30 – $70
- Drain Pan: $20 – $50
- Water Line: $10 – $30
If the repairs are extensive and the refrigerator is old, it might be more cost-effective to consider replacing the entire unit. New refrigerators range from $500 to $2000+.
Safety Warning
- Always unplug the refrigerator before performing any maintenance or repairs.
- Avoid standing water to prevent electric shock.
- Be careful when using sharp objects to clear the defrost drain.
- If you’re uncomfortable working with electrical components, consult a qualified technician.
Tools You May Need
- Screwdrivers (Phillips and flathead)
- Pliers
- Pipe cleaner or flexible wire
- Turkey baster or syringe
- Warm water
- Vacuum cleaner with brush attachment
- Level
- Hairdryer (optional)
FAQ
Here are some frequently asked questions about refrigerator leaks:
- Q: Why is my refrigerator leaking after I cleaned it? A: You may have accidentally dislodged the defrost drain hose or caused ice to melt rapidly, overwhelming the drain. Double-check the drain hose and clear any blockages.
- Q: How often should I clean my refrigerator’s condenser coils? A: Ideally, you should clean the condenser coils every 6 months to a year.
- Q: Can a full refrigerator cause a leak? A: An overstuffed refrigerator can restrict airflow, leading to temperature fluctuations and condensation. Avoid overcrowding the shelves.
- Q: What if I can’t find the defrost drain? A: Consult your refrigerator’s owner’s manual. It will have a diagram showing the location of the defrost drain.
Conclusion
A leaking refrigerator can be a frustrating problem, but with a little patience and these troubleshooting steps, you can often resolve the issue yourself. Remember to start with the simplest solutions, like clearing the defrost drain, and work your way up to more complex repairs. If you’re not comfortable performing any of these steps, don’t hesitate to call a qualified appliance repair technician. However, by trying these DIY methods first, you might save yourself time and money!
Youtube Video:
Looking for more useful options?
Check out recommended resources that others find helpful.