Introduction
Discovering water leaking from underneath your Whirlpool refrigerator can be alarming. Not only can it damage your flooring, but it also indicates a problem that could potentially affect the refrigerator’s performance and lead to food spoilage. This is a common issue for homeowners, often noticed after a defrost cycle or when retrieving items from the fridge. Addressing this leak promptly is crucial to prevent further damage and ensure your refrigerator functions efficiently.
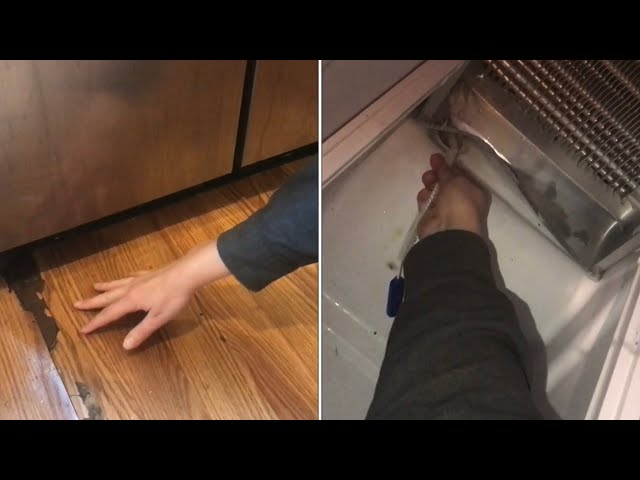
Common Causes of My Whirlpool Refrigerator is Leaking Water From Underneath
Here are some of the most frequent reasons why your Whirlpool refrigerator might be leaking water from underneath:
- Clogged Defrost Drain: This is the most common culprit. The defrost drain carries water from the defrost cycle to a pan under the fridge where it evaporates. When clogged with food particles or debris, the water overflows.
- Frozen Defrost Drain: Similar to a clog, ice buildup in the drain can block the water flow.
- Full Drain Pan: The drain pan under the refrigerator might be full and overflowing, especially if the evaporation process isn’t working correctly.
- Loose Water Line: If your refrigerator has an ice maker or water dispenser, a loose or cracked water line can cause leaks.
- Damaged Water Filter Housing: Cracks or leaks in the water filter housing can also lead to water accumulating underneath the fridge.
- Door Seal Problems: A worn or damaged door seal can let warm air in, causing excessive condensation and leading to water buildup.
- Leaky Water Tank: Some refrigerators have a small water tank inside that can develop leaks over time.
- Leveling Issues: An unlevel refrigerator can cause the drain pan to overflow because the water isn’t distributed evenly.
Symptoms Checklist
These indicators can help you confirm the source of the leak:
- Puddle of water forming beneath the refrigerator.
- Water stains or dampness on the floor near the refrigerator.
- Ice buildup in the freezer compartment.
- Unusual noises coming from the refrigerator.
- Water dripping from the inside of the refrigerator.
- Frost accumulating on the back wall of the freezer.
- Food spoiling faster than usual.
How to Fix My Whirlpool Refrigerator is Leaking Water From Underneath Step-by-Step Guide
Follow these steps to troubleshoot the leak:
- Unplug the Refrigerator: For safety, always disconnect the refrigerator from the power outlet before starting any troubleshooting or repairs.
- Locate the Defrost Drain: This is usually found on the back wall of the freezer compartment, near the bottom.
- Check for Ice Buildup: Examine the drain for any visible ice obstructing the opening.
- Melt the Ice: Use a hair dryer (on a low setting) to gently melt the ice blockage. Be careful not to overheat the area or melt any plastic components.
- Flush the Drain: Use a turkey baster or syringe to flush the drain with warm water. You can also use a mixture of warm water and baking soda to help dissolve any clogs.
- Clear the Drain: Carefully insert a flexible object, like a pipe cleaner or a thin, flexible wire (NOT a sharp metal tool!), into the drain to dislodge any debris.
- Locate the Drain Pan: The drain pan is usually located beneath the refrigerator, near the compressor.
- Check the Drain Pan: Carefully pull out the drain pan (if accessible) and inspect it. Is it full of water? Is it cracked or damaged?
- Empty the Drain Pan: If the pan is full, carefully empty it. Clean the pan with soap and water.
- Check the Water Line: If your refrigerator has an ice maker or water dispenser, inspect the water line for any leaks or damage. Ensure all connections are tight.
- Inspect the Water Filter Housing: Examine the water filter housing for any cracks or leaks. If you find any damage, note the model number of your fridge.
- Check the Door Seals: Inspect the door seals for any tears, cracks, or gaps. Clean the seals with warm water and mild soap.
- Level the Refrigerator: Use a level to ensure that the refrigerator is properly leveled. Adjust the leveling feet at the bottom of the refrigerator as needed.
- Plug in the Refrigerator: After completing the troubleshooting steps, plug the refrigerator back into the power outlet.
- Monitor for Leaks: Observe the area under the refrigerator for any new leaks. It may take some time to see if the problem is resolved.
Fix the Issue Without Buying Parts
Before considering replacement parts, try these cost-free solutions:
- Refrigerator Reset: Unplug the refrigerator for 30 minutes and then plug it back in. This can sometimes resolve minor issues.
- Thorough Cleaning: Clean the inside of the refrigerator regularly to prevent food particles from clogging the defrost drain.
- Door Seal Cleaning: Wipe down the door seals regularly to maintain a tight seal.
- Regular Inspection: Periodically check the drain pan and water lines for any signs of leaks or damage.
- Proper Loading: Avoid overfilling the refrigerator, as this can restrict airflow and cause condensation.
When Replacement Might Be Necessary
If the leak persists after trying the above steps, or if you discover significant damage to components like the water tank or water filter housing, replacement may be necessary. Parts like the defrost heater (if faulty and causing excessive ice buildup) and damaged water lines might also need replacing. Estimated cost ranges can vary depending on the part and the complexity of the repair, but you can expect to pay anywhere from $50 to $300+ for parts and potentially more for professional installation. Common failing parts include the defrost heater, water inlet valve, and water filter housing.
Safety Warning
- Always unplug the refrigerator before attempting any repairs.
- Be careful when using a hair dryer to melt ice, as excessive heat can damage plastic components.
- Avoid contact with water while the refrigerator is plugged in.
- Clean up any spills immediately to prevent slips and falls.
- If you’re uncomfortable performing any of these steps, consult a qualified appliance repair technician.
Tools You May Need
- Screwdrivers (Phillips and flathead)
- Turkey baster or syringe
- Warm water
- Baking soda
- Pipe cleaner or flexible wire
- Hair dryer
- Level
- Towels
FAQ
Here are some frequently asked questions about refrigerator leaks:
- Q: Why is my refrigerator leaking after a power outage? A: A power outage can sometimes cause ice to melt in the freezer, which then overflows the drain pan when power is restored.
- Q: How often should I clean the defrost drain? A: It’s recommended to clean the defrost drain every 6 months to prevent clogs.
- Q: Can a full freezer cause leaks? A: Yes, an overfilled freezer can restrict airflow and cause ice buildup, which can lead to leaks.
- Q: What does it mean if the water tastes bad? A: Bad tasting water might indicate that the water filter needs to be replaced.
Conclusion
Troubleshooting a water leak from your Whirlpool refrigerator can seem daunting, but by following these steps, you can often identify and fix the problem yourself. Remember to prioritize safety and take your time. If you’ve tried these steps and the leak persists, don’t hesitate to contact a qualified appliance repair technician for assistance. Addressing the problem quickly can save you money and prevent further damage to your refrigerator and your home.
Youtube Video:
Looking for more useful options?
Check out recommended resources that others find helpful.