Introduction
Discovering a puddle of water under your KitchenAid refrigerator can be frustrating and concerning. Not only does it create a potential slipping hazard, but it can also lead to water damage to your flooring. A leaking refrigerator could indicate a minor issue or a more significant problem requiring attention. Addressing the leak promptly can prevent further damage and potential costly repairs. Don’t ignore the problem! Let’s troubleshoot this together.
Common Causes of my kitchenaid refrigerator is leaking water
- Clogged Defrost Drain: This is the most common culprit. Ice buildup can block the drain, causing water to overflow.
- Frozen Water Line: If your refrigerator has an ice maker or water dispenser, the water line can freeze, then melt and leak as it thaws.
- Loose or Damaged Water Line Connections: Connections to the water supply can loosen or crack over time.
- Cracked or Damaged Drain Pan: The drain pan, located at the bottom of the refrigerator, collects excess water. If cracked, it will leak.
- Faulty Water Inlet Valve: This valve controls the water flow to the ice maker and water dispenser. If faulty, it may leak.
- Damaged Door Seal: A worn or damaged door seal can allow warm air to enter, leading to condensation and leaks.
- High Humidity: In humid environments, condensation can form inside the refrigerator and drip down.
- Overfilled Ice Maker: An overfilled ice maker can spill ice and water.
Symptoms Checklist
- Puddle of water beneath or in front of the refrigerator.
- Water dripping from the freezer compartment.
- Ice buildup in the freezer.
- Water pooling inside the refrigerator.
- Water leaking from the ice maker or water dispenser.
- Unusual noises coming from the refrigerator.
How to Fix my kitchenaid refrigerator is leaking water Step-by-Step Guide
- Unplug the Refrigerator: For safety, always disconnect the power before starting any repairs.
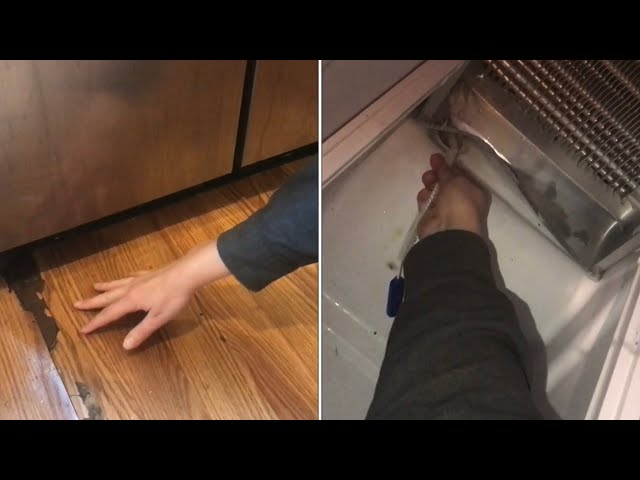
- Locate the Defrost Drain: This is usually located on the back wall of the freezer compartment, near the bottom. It may be covered by a panel.
- Melt Any Ice Buildup: Use a hairdryer on a low setting to gently melt any ice blocking the drain. Avoid using sharp objects that could damage the drain.
- Flush the Drain: Use a turkey baster or syringe filled with warm water to flush out the drain. You can also use a flexible wire or pipe cleaner to gently clear any debris.
- Check the Drain Pan: Locate the drain pan at the bottom of the refrigerator. It may be accessible from the front or the back.
- Inspect the Drain Pan: Look for cracks or damage. If the pan is full of water, carefully empty it.
- Examine Water Line Connections: If you have an ice maker or water dispenser, check the water line connections at the back of the refrigerator and at the water supply valve.
- Tighten Connections: If any connections are loose, tighten them gently with a wrench. Be careful not to overtighten.
- Inspect Water Lines: Check the water lines for any cracks or damage.
- Check the Door Seal: Inspect the door seal for any tears, cracks, or gaps. Clean the seal with a damp cloth to remove any debris.
- Ensure Proper Ventilation: Make sure there is adequate space around the refrigerator for proper ventilation. This helps prevent condensation.
- Monitor the Refrigerator: Plug the refrigerator back in and monitor it for leaks over the next 24-48 hours.
- Clean the Condenser Coils: Located at the back of the refrigerator. Dust buildup can reduce efficiency and lead to condensation. Unplug the unit and vacuum the coils.
Fix the Issue Without Buying Parts
Before considering replacement parts, try these free methods:
- Refrigerator Reset: Unplug the refrigerator for 30 minutes to reset the system. This can sometimes resolve minor issues.
- Thorough Cleaning: Clean the interior of the refrigerator regularly to prevent food debris from blocking the drain.
- Temperature Adjustment: Ensure the refrigerator and freezer temperatures are set correctly. Very low temperatures can cause excessive ice buildup. Recommended: Fridge at 37F (3C), Freezer at 0F (-18C).
- Inspection Tips: Regularly inspect the back of the refrigerator for any signs of water or ice buildup.
- Maintenance Basics: Keep the refrigerator clean and well-ventilated to prevent future leaks.
When Replacement Might Be Necessary
If the leak persists after trying the above steps, a faulty water inlet valve, a severely cracked drain pan, or a damaged water line might require replacement. Replacement parts can range from $20 to $150, depending on the part and model. A failing water inlet valve is a common culprit requiring replacement.
Safety Warning
- Always unplug the refrigerator before attempting any repairs.
- Avoid working on electrical components with wet hands.
- Be cautious when using a hairdryer near water.
- Clean up any water spills immediately to prevent slipping.
Tools You May Need
- Screwdriver (Phillips and flathead)
- Wrench
- Turkey baster or syringe
- Flexible wire or pipe cleaner
- Hairdryer
- Multimeter (optional, for testing electrical components)
- Vacuum with hose attachment
FAQ
- Why is my KitchenAid refrigerator leaking water even after I cleaned the drain?: There may be a crack in the drain pan or the water line connections are loose. Re-inspect these components.
- How do I find the defrost drain in my KitchenAid refrigerator?: It’s typically located at the back of the freezer compartment, near the bottom. Check your refrigerator’s user manual for the exact location.
- Can I use bleach to clean the defrost drain?: A small amount of diluted bleach (1 part bleach to 10 parts water) can help disinfect the drain, but be sure to flush it thoroughly afterward. Avoid using concentrated bleach, as it can damage the drain.
- What if the water continues to leak after I’ve tried everything?: If the leak persists, it’s best to consult a qualified appliance repair technician.
Conclusion
Troubleshooting a leaking KitchenAid refrigerator can seem daunting, but by following these steps, you can often identify and resolve the issue yourself. Remember to prioritize safety and take your time. If you’re uncomfortable with any of these steps, or if the problem persists, don’t hesitate to call a qualified appliance repair technician. Good luck!
Youtube Video:
Looking for more useful options?
Check out recommended resources that others find helpful.