Introduction
A leaking washing machine door can be a frustrating problem. Not only does it waste water, but it can also damage your floors and lead to mold growth. A leaking door is when water escapes from the front of your LG Tromm washing machine during a wash cycle. Addressing this issue quickly is important to prevent further damage and inconvenience.
Common Causes of lg tromm washer door leaking
Here are some of the most frequent reasons why your LG Tromm washer door might be leaking:
- Worn Door Seal (Gasket): The rubber seal around the door can become cracked, torn, or simply worn out over time, creating gaps for water to escape.
- Obstructions in the Seal: Small objects like socks, coins, or pet hair can get trapped between the seal and the door, preventing a tight closure.
- Overloading the Washer: Putting too many clothes in the machine can put extra pressure on the door and seal, causing it to leak.
- Improper Closing of the Door: Sometimes, the door isn’t fully closed and latched, resulting in a leak.
- Detergent Buildup: Excess detergent can leave residue that interferes with the seal’s ability to create a watertight closure.
- Uneven Washer: If your washing machine isn’t level, it can cause the door to not seal correctly, leading to leaks.
- Damaged Door Latch: A faulty door latch may not fully engage, leaving a gap for water to seep through.
- Clogged Drain Pump Filter: Although not directly related to the door, a clogged filter can cause excessive water levels that can push water out through the door.
Symptoms Checklist
Check these indicators to confirm the source of the problem:
- Water pooling on the floor in front of the washing machine.
- Visible drips or streams of water coming from around the door during a wash cycle.
- A musty or moldy smell near the washing machine.
- The door seal feels sticky, cracked, or damaged.
- The door doesn’t seem to close completely or latch properly.
How to Fix lg tromm washer door leaking Step-by-Step Guide
Follow these steps to troubleshoot and potentially fix the leak:
- Unplug the Washer: Before starting any work, disconnect the washing machine from the power outlet for safety.
- Inspect the Door Seal (Gasket): Carefully examine the rubber seal around the door for any cracks, tears, or debris. Use a flashlight for a thorough inspection.
- Remove Obstructions: If you find any foreign objects lodged in the seal, carefully remove them.
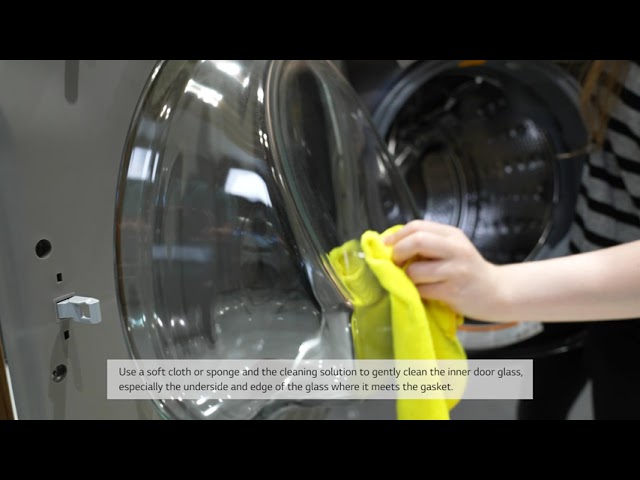
- Clean the Door Seal: Wipe down the door seal with a damp cloth to remove any detergent residue or buildup. You can use a mild soap solution if needed.
- Check the Door Latch: Ensure the door latch is engaging properly. Try opening and closing the door several times to see if it latches securely.
- Level the Washer: Use a level to check if the washing machine is sitting evenly. Adjust the leveling feet at the bottom of the machine until it’s level.
- Avoid Overloading: Make sure you’re not putting too many clothes in the washer. Refer to your owner’s manual for the recommended load size.
- Check Detergent Usage: Use the correct amount of detergent as recommended by the manufacturer. Excessive detergent can lead to buildup.
- Run a Cleaning Cycle: Many LG Tromm washers have a cleaning cycle designed to remove buildup. Run this cycle periodically to maintain the machine’s performance.
- Run a Test Cycle: After cleaning and inspecting, run a small test load to see if the leak is resolved. Observe the door closely during the cycle.
- Check the Drain Pump Filter: Locate and clean the drain pump filter (usually at the bottom front of the machine) as a preventative measure. Refer to your owner’s manual for instructions.
- Ensure Proper Door Closure: Before starting a wash, double-check that the door is fully closed and latched securely.
Fix the Issue Without Buying Parts
Before considering replacement parts, try these free methods:
- Reset the Washer: Unplug the washer for 5 minutes, then plug it back in. This can sometimes reset the machine and resolve minor issues.
- Deep Cleaning: Regularly clean the door seal with a mixture of vinegar and water.
- Recalibration (If Applicable): Some models may have a recalibration setting in the menu. Consult your manual.
- Inspect Regularly: Routinely check the door seal and latch for any signs of wear or damage. Early detection can prevent leaks.
When Replacement Might Be Necessary
If you’ve tried all the troubleshooting steps and the door is still leaking, the door seal (gasket) or the door latch might need to be replaced. A new door seal typically costs between $50 and $150, while a new door latch can range from $30 to $80, plus the cost of labor if you hire a technician.
Safety Warning
- Always unplug the washing machine before performing any maintenance or repairs.
- Be careful when working around water to avoid electrical shock.
- If you’re uncomfortable performing any of these steps, consult a qualified appliance repair technician.
- Wipe up any spilled water immediately to prevent slips and falls.
Tools You May Need
- Screwdriver (Phillips and flathead)
- Adjustable wrench
- Level
- Flashlight
- Clean cloths
- Mild soap or vinegar solution
FAQ
Here are some common questions about leaking washer doors:
- Q: Why is my new washer leaking? A: Even new washers can leak if the door seal isn’t properly seated or if there’s a manufacturing defect. Double-check the seal and contact the manufacturer if the issue persists.
- Q: Can I use bleach to clean the door seal? A: While bleach can kill mold, it can also damage the rubber seal over time. Use a mild soap or vinegar solution instead.
- Q: How often should I clean the door seal? A: Clean the door seal at least once a month, or more frequently if you notice buildup or odors.
- Q: Is a small amount of water leaking normal? A: No, any amount of water leaking from the door is not normal and should be addressed to prevent further damage.
Conclusion
Troubleshooting a leaking LG Tromm washer door might seem daunting, but by following these steps, you can often resolve the issue yourself. Remember to prioritize safety and take your time. If you’re not comfortable with any of the steps, don’t hesitate to call a qualified appliance repair technician. Good luck!
Youtube Video:
Looking for more useful options?
Check out recommended resources that others find helpful.