Introduction
Finding water on the floor near your KitchenAid refrigerator can be frustrating and a sign of a problem. Ignoring the leak can lead to water damage to your floors and potentially mold growth. This guide will help you troubleshoot the most common causes of a leaking refrigerator, walk you through simple fixes, and help you determine when it’s time to call a professional. Leaks often appear after defrost cycles, after loading the fridge with groceries, or seemingly out of nowhere. Don’t worry, you can tackle this!
Common Causes of KitchenAid Fridge Leaking Water on Floor
Several things can cause your KitchenAid fridge to leak water. Here are some of the most common culprits:
- Clogged Defrost Drain: This is the most frequent cause. Ice builds up and melts during the defrost cycle, and if the drain is blocked, the water overflows.
- Frozen Water Line: If your fridge has a water dispenser or ice maker, the water line can freeze, then thaw and leak.
- Loose Water Line Connections: The connections to the water line can loosen over time, causing drips.
- Cracked or Damaged Water Filter Housing: A faulty water filter housing can leak.
- Damaged Door Seal (Gasket): If the door seal isn’t tight, warm air can enter, causing condensation that turns into water.
- Full Drain Pan: The drain pan, located at the bottom of the fridge, collects defrost water. If it’s full, it will overflow.
- Leaking Water Filter: A poorly installed or damaged water filter can be a source of water leak.
- Faulty Water Inlet Valve: This valve controls the water flow to the ice maker and dispenser. A leaky valve will drip.
Symptoms Checklist
Use this checklist to help identify the possible issue:
- Water pooling at the base of the refrigerator.
- Ice buildup inside the freezer compartment (especially near the back panel).
- Water leaking from the water dispenser or ice maker.
- Visible damage or cracks in the water filter housing.
- Water dripping from the bottom of the refrigerator doors.
- Frost accumulating on the freezer door seal.
- A musty or moldy smell near the refrigerator.
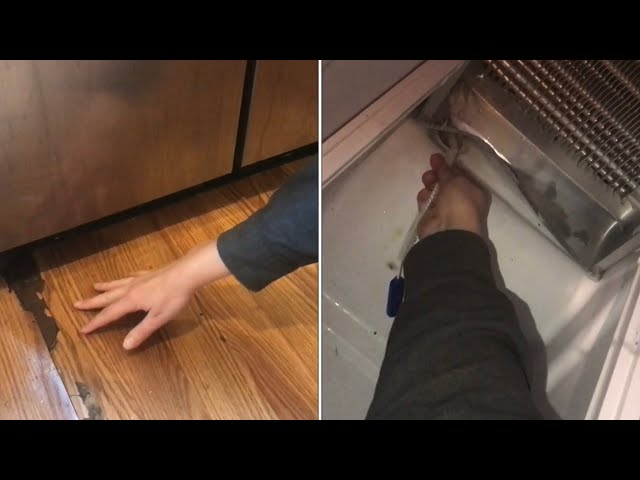
How to Fix KitchenAid Fridge Leaking Water on Floor Step-by-Step Guide
Follow these steps to troubleshoot and fix the leak:
- Safety First: Unplug your refrigerator from the power outlet before starting any troubleshooting.
- Locate the Source of the Leak: Carefully observe where the water is coming from. This will help you narrow down the problem.
- Check the Defrost Drain: Open the freezer and locate the back panel. In many KitchenAid models, you can remove this panel. You’ll see a drain hole at the bottom.
- Clear the Defrost Drain: Use a turkey baster, a long, flexible wire, or a pipe cleaner to gently clear any blockage in the drain. Hot water can also help melt the ice.
- Check the Water Line Connections: If your fridge has a water dispenser or ice maker, inspect the water line connections at the back of the refrigerator and behind the fridge. Tighten any loose connections.
- Inspect the Water Filter Housing: Locate the water filter housing (usually inside the refrigerator compartment). Look for any cracks or damage. Make sure the filter is properly installed.
- Clean the Door Seal (Gasket): Use a damp cloth to clean the door seal around the refrigerator and freezer doors. Remove any food debris or buildup.
- Check the Drain Pan: Locate the drain pan at the bottom of the refrigerator (usually behind a kick plate). Remove the pan and empty any water. Clean the pan thoroughly.
- Test the Water Dispenser and Ice Maker: If your fridge has these features, test them to see if they are leaking. Look for drips around the dispenser and ice maker components.
- Ensure Fridge is Level: Use a level to ensure your fridge is properly level from front to back and side to side. An unlevel fridge can cause drain issues.
- Monitor for a Few Days: After completing these steps, plug the refrigerator back in and monitor it for a few days to see if the leak has stopped.
Fix the Issue Without Buying Parts
Sometimes, you can resolve the leak without needing to replace any parts:
- Reset: Unplugging the fridge for 30 minutes can sometimes reset the system and resolve minor issues.
- Cleaning: Regularly cleaning the interior of your fridge, including the door seals and drain pan, can prevent buildup and leaks.
- Check for Obstructions: Make sure items inside the refrigerator aren’t blocking vents or drain holes.
- Proper Loading: Avoid overfilling the refrigerator. Leave space for air to circulate properly.
When Replacement Might Be Necessary
If the leak persists after trying the above steps, a part replacement might be necessary. Common parts that fail include:
- Water Filter Housing: If cracked, it needs replacement. (Estimated cost: $30-$80 USD)
- Water Inlet Valve: If leaking, it needs replacement. (Estimated cost: $50-$120 USD)
- Door Seal (Gasket): If torn or damaged, it needs replacement. (Estimated cost: $40-$100 USD)
- Defrost Heater or Thermostat: If these components fail, defrosting problems can lead to leaks. These repairs are best left to professionals due to electrical components.
Safety Warning
- Always unplug the refrigerator from the power outlet before performing any repairs.
- Be careful when handling hot water.
- Wipe up any spilled water immediately to prevent slips and falls.
- If you’re uncomfortable performing any of these steps, contact a qualified appliance repair technician.
Tools You May Need
- Screwdriver (Phillips and flathead)
- Turkey baster or long, flexible wire
- Pipe cleaner
- Damp cloth or sponge
- Adjustable wrench
- Level
FAQ
- Why is my fridge leaking even after I cleared the drain? The drain might be freezing up again. Try pouring hot water down the drain periodically. Also, check the door seal for air leaks, which can cause ice buildup.
- How often should I clean the drain pan? Ideally, you should clean the drain pan every 6 months, or more frequently if you notice it’s filling up quickly.
- Why is my water filter leaking? The water filter might be improperly installed or damaged. Try removing and reinstalling the filter, making sure it’s securely in place. If the problem persists, replace the filter.
- When should I call a professional? If you’ve tried all the troubleshooting steps and the leak continues, or if you’re uncomfortable working with electrical components, it’s best to call a qualified appliance repair technician.
Conclusion
Don’t let a leaky KitchenAid refrigerator dampen your day! By following this guide, you can often diagnose and fix the problem yourself, saving time and money. Remember to prioritize safety and take your time. If you’re unsure about any step, don’t hesitate to contact a qualified appliance repair technician. With a little effort, you can get your fridge back in top working condition and keep your kitchen dry!
Youtube Video:
Looking for more useful options?
Check out recommended resources that others find helpful.