Introduction
Discovering water leaking from your KitchenAid fridge freezer can be alarming and frustrating. Not only can it damage your floors, but it also suggests a problem that, if left unaddressed, could lead to more significant appliance issues and higher energy bills. This guide is designed to help you identify the source of the leak and provide simple, step-by-step troubleshooting instructions. Addressing this promptly can prevent further damage and ensure your fridge freezer continues to run efficiently.
Common Causes of KitchenAid Fridge Freezer Leaking Water
Here are some of the most common reasons why your KitchenAid fridge freezer might be leaking water:
- Clogged Defrost Drain: This is the most frequent culprit. Ice buildup can block the drain, causing water to overflow.
- Frozen Water Line: If your fridge has an ice maker or water dispenser, the water line can freeze, then thaw, leading to a leak.
- Defective Water Inlet Valve: This valve controls the water flow to the ice maker and dispenser. If it’s faulty, it might leak.
- Cracked or Loose Water Line: Over time, the plastic water lines can crack or loosen at the connections, causing leaks.
- Damaged Drain Pan: Located at the bottom of the fridge, the drain pan collects defrost water. If it’s cracked, water will leak.
- Door Seal Issues: If the door seals are damaged or dirty, warm air can enter the fridge, causing excessive condensation and potential leaks.
- Overfilled Ice Maker: Sometimes the ice maker can produce too much ice, which then melts and leaks.
- Uneven Fridge Leveling: If the fridge isn’t level, water might not drain properly and could leak.
Symptoms Checklist
Look for these signs to confirm the source of the leak:
- Water pooling on the floor in front of the fridge.
- Ice buildup on the back wall of the freezer.
- Water dripping from the bottom of the freezer compartment.
- Water stains or dampness around the base of the fridge.
- Unusual noises from the ice maker.
- Reduced ice production or no ice at all.
How to Fix KitchenAid Fridge Freezer Leaking Water Step-by-Step Guide
Follow these steps to troubleshoot and fix the leak:
- Unplug the Fridge: Safety first! Disconnect the fridge from the power outlet.
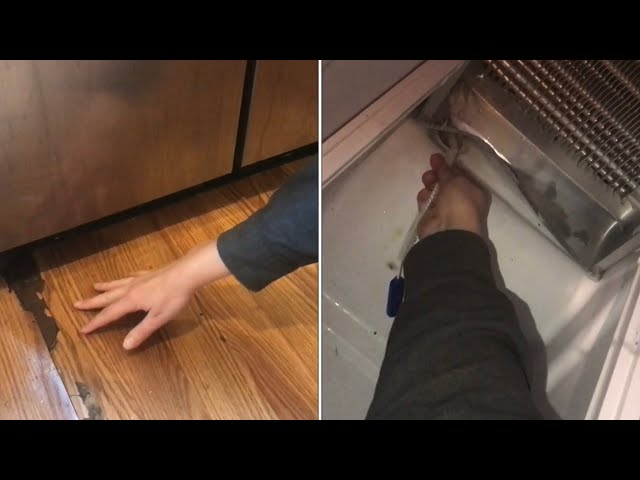
- Locate the Defrost Drain: This is usually located on the back wall of the freezer compartment, often behind a panel.
- Clear the Defrost Drain: Use a turkey baster with warm water to flush out any ice or debris. A flexible wire or pipe cleaner can also help dislodge stubborn blockages.
- Check the Water Line (If Applicable): Inspect the water line connecting to the fridge. Look for cracks, kinks, or loose connections. Tighten any loose fittings.
- Examine the Water Inlet Valve (If Applicable): This is usually located at the back of the fridge. Check for leaks around the valve and its connections.
- Inspect the Drain Pan: Locate the drain pan (usually at the bottom of the fridge, either behind a kickplate or on the back). Remove it and check for cracks or damage.
- Clean the Door Seals: Wipe down the door seals with warm water and mild soap. Ensure they are clean and sealing properly.
- Level the Fridge: Use a level to check if the fridge is properly leveled. Adjust the leveling feet at the bottom of the fridge as needed.
- Check Ice Maker Settings (If Applicable): Make sure the ice maker is set to the correct production level and that it’s not overfilling.
- Thaw Frozen Water Lines (If Applicable): If you suspect a frozen water line, try thawing it with a hairdryer on a low setting. Be careful not to overheat the plastic.
- Reassemble Components: Once you’ve addressed the potential issues, reassemble any components you removed.
- Plug in the Fridge: Reconnect the fridge to the power outlet.
- Monitor for Leaks: Observe the fridge for the next 24-48 hours to see if the leak has stopped.
Fix the Issue Without Buying Parts
Before considering replacements, try these free methods:
- Reset the Fridge: Unplug the fridge for 10 minutes and then plug it back in. This can sometimes reset the system and resolve minor issues.
- Deep Cleaning: Thoroughly clean the inside of the fridge, paying attention to the back wall and any areas where ice tends to build up.
- Recalibration (If Applicable): Some KitchenAid models have a calibration feature. Check your user manual for instructions on how to recalibrate the temperature settings.
- Regular Inspection: Regularly inspect the fridge for ice buildup, leaks, and other potential problems. Catching issues early can prevent them from becoming major headaches.
- Proper Ventilation: Make sure the fridge has adequate ventilation. Don’t block the vents inside the fridge with food containers.
When Replacement Might Be Necessary
If the leak persists after trying all the troubleshooting steps, a faulty component might be the cause. Here are some parts that commonly fail:
- Water Inlet Valve: If the valve is leaking, it needs to be replaced. Estimated cost: $30-$70.
- Drain Pan: If the pan is cracked, it should be replaced to prevent further leaks. Estimated cost: $20-$50.
- Water Line: If a water line is cracked beyond repair, it must be replaced. Estimated cost: $10-$30.
Consider consulting a qualified appliance repair technician for diagnosis and repair if you’re not comfortable replacing parts yourself.
Safety Warning
- Always unplug the fridge before performing any repairs.
- Be careful when working with water and electricity. Avoid creating wet conditions that could lead to electric shock.
- Use caution when handling sharp tools or objects.
- Clean up any spills immediately to prevent slips and falls.
Tools You May Need
- Screwdrivers (Phillips and flathead)
- Adjustable wrench
- Turkey baster or syringe
- Flexible wire or pipe cleaner
- Level
- Warm water and mild soap
- Clean cloths or towels
FAQ
Here are some frequently asked questions about fridge freezer leaks:
-
Q: Why is my fridge leaking even after I cleaned the drain?
A: There might be a deeper blockage in the drain line, or the drain pan could be cracked. Check both carefully. -
Q: How often should I clean the defrost drain?
A: Ideally, you should clean the defrost drain every 6 months to prevent clogs. -
Q: Can a leaking fridge cause mold?
A: Yes, standing water can create a breeding ground for mold. Clean up spills promptly and address leaks as soon as possible. -
Q: Is it safe to use bleach to clean the defrost drain?
A: No, avoid using bleach as it can damage the drain components. Warm water and mild soap are sufficient.
Conclusion
A leaking KitchenAid fridge freezer can be a nuisance, but with a little patience and these troubleshooting steps, you can often resolve the issue yourself. Remember to prioritize safety and take your time. If you’re uncomfortable performing any of these tasks, don’t hesitate to call a qualified appliance repair technician. Addressing the problem promptly will save you money in the long run and keep your kitchen dry!
Youtube Video:
Looking for more useful options?
Check out recommended resources that others find helpful.