Introduction
Discovering water leaking from your KitchenAid bottom freezer refrigerator can be frustrating and concerning. A refrigerator leak, even a small one, can lead to water damage on your flooring, mold growth, and even higher utility bills. The good news is that many leaks are due to simple issues you can resolve yourself. This guide will walk you through the most common causes and provide easy-to-follow steps to troubleshoot and fix the problem. Addressing the leak quickly is important to prevent further damage and maintain your refrigerator’s efficiency.
Common Causes of KitchenAid Bottom Freezer Refrigerator Leaking Water
Here are some common culprits behind water leaks in KitchenAid bottom freezer refrigerators:
- Clogged Defrost Drain: This is the most frequent cause. Ice buildup blocks the drain, causing water to overflow during the defrost cycle.
- Frozen or Damaged Water Line: If your fridge has an ice maker or water dispenser, a frozen or cracked water line can leak.
- Loose Water Line Connections: Connections to the water filter, ice maker, or water valve might loosen over time.
- Faulty Water Filter Housing: Cracks or loose seals in the water filter housing can cause leaks.
- Damaged Door Seals (Gaskets): Worn or damaged door seals allow warm air in, causing excessive condensation and potential leaks.
- Overfilling Ice Maker: A malfunctioning ice maker can overfill, leading to water spilling.
- Cracked Drain Pan: The drain pan located at the bottom of the refrigerator (often near the compressor) can crack and leak.
- High Humidity: In humid environments, condensation can form inside the fridge and eventually leak.
Symptoms Checklist
Check for these signs to pinpoint the source of the leak:
- Water pooling under the refrigerator.
- Water leaking from inside the freezer compartment.
- Ice buildup in the freezer, especially around the defrost drain.
- Water dripping from the ice maker or water dispenser.
- Water stains on the floor around the fridge.
- Visible condensation inside the refrigerator.
How to Fix KitchenAid Bottom Freezer Refrigerator Leaking Water Step-by-Step Guide
Follow these steps to troubleshoot and fix your leaking KitchenAid refrigerator:
- Unplug the Refrigerator: Safety first! Always unplug the appliance before starting any troubleshooting or repair.
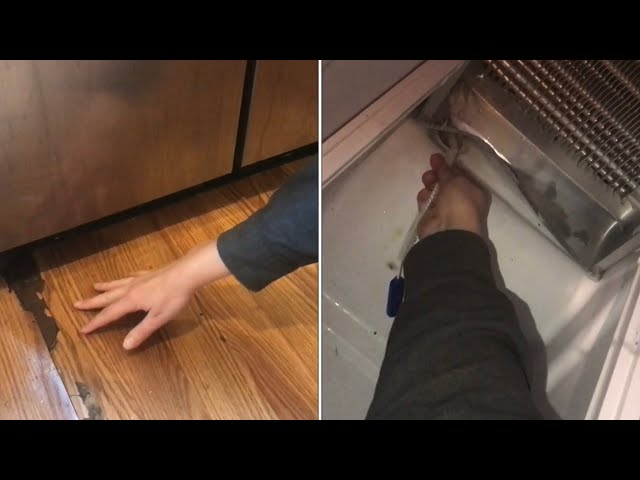
- Locate the Defrost Drain: Inside the freezer, usually at the back panel, you’ll find the defrost drain. It’s typically a small hole or opening.
- Melt Any Ice Buildup: If you see ice blocking the drain, use a hairdryer (on a low setting) to gently melt the ice. Be patient!
- Clear the Defrost Drain: Use a turkey baster filled with warm water to flush the drain. You can also use a thin, flexible object like a pipe cleaner or a straightened coat hanger to carefully dislodge any debris. Avoid forcing anything too large, as you could damage the drain.
- Check the Drain Pan: Locate the drain pan (usually at the bottom back of the fridge, near the compressor). Empty it if it’s full and inspect it for cracks.
- Inspect Water Lines: If your refrigerator has an ice maker or water dispenser, carefully examine the water lines (typically plastic or copper tubing) for any signs of damage, cracks, or leaks.
- Tighten Water Line Connections: Using a wrench, gently tighten any loose connections to the water filter, ice maker, or water valve. Be careful not to overtighten.
- Check the Water Filter Housing: Inspect the water filter housing for cracks or leaks. Remove and reinstall the filter, ensuring it’s properly seated.
- Inspect Door Seals (Gaskets): Check the door seals for damage, tears, or gaps. Clean the seals with warm, soapy water and a soft cloth.
- Test the Door Seals: Close the refrigerator door on a piece of paper. If you can easily pull the paper out, the seal may need attention.
- Adjust Refrigerator Leveling: Ensure the refrigerator is level. Use a level to check. Adjust the leveling feet at the bottom of the refrigerator to achieve a level position.
- Clean the Condenser Coils: Dirty condenser coils can reduce efficiency and cause excessive condensation. Locate the coils (usually at the back or bottom of the fridge) and vacuum them clean.
- Plug the Refrigerator Back In: After completing the above steps, plug the refrigerator back in and monitor it for any further leaks.
Fix the Issue Without Buying Parts
Often, the leaking issue can be resolved without buying new parts. Regularly cleaning the defrost drain and condenser coils can prevent future problems. Ensuring the refrigerator is level and the door seals are clean and intact are also crucial maintenance steps. Consider adjusting the temperature settings if you live in a humid environment to reduce condensation.
When Replacement Might Be Necessary
If you’ve tried all the troubleshooting steps and the leak persists, or if you’ve identified a cracked drain pan or a severely damaged water line, replacement may be necessary. Replacing a drain pan can cost between $30-$80. A new water line can range from $20-$50. In rare cases, a failing water valve (costing $50-$150) might be the issue, requiring replacement.
Safety Warning
- Always unplug the refrigerator before starting any repairs.
- Be careful when working with water and electricity.
- Wipe up any spills immediately to prevent slips and falls.
- If you’re uncomfortable with any of these steps, consult a qualified appliance repair technician.
Tools You May Need
- Screwdriver (Phillips and flathead)
- Wrench
- Turkey baster
- Pipe cleaner or straightened coat hanger
- Vacuum cleaner
- Warm water and soap
- Soft cloth
- Level
- Hair dryer (optional, for melting ice)
FAQ
Here are some frequently asked questions about refrigerator leaks:
- Q: Why is my refrigerator leaking after a power outage? A: A power outage can cause ice to melt and flood the defrost drain. Follow the steps to clear the drain.
- Q: How often should I clean the defrost drain? A: It’s recommended to clean the defrost drain every 6 months to prevent clogs.
- Q: Can a full refrigerator cause leaks? A: An overly full refrigerator can restrict airflow, leading to increased condensation. Organize your refrigerator and avoid overfilling it.
- Q: What if the water filter housing is cracked? A: A cracked water filter housing will need to be replaced. Contact KitchenAid or a reputable appliance parts supplier.
Conclusion
Troubleshooting a KitchenAid bottom freezer refrigerator leak can seem daunting, but by following these steps, you can often identify and resolve the issue yourself, saving time and money. Don’t hesitate to try these fixes before calling a technician you might be surprised at how easily you can solve the problem! If the leaking persists despite your best efforts, contacting a qualified appliance repair professional is the best course of action.
Youtube Video:
Looking for more useful options?
Check out recommended resources that others find helpful.