Introduction
Discovering standing water in your Kenmore Elite washing machine after a completed cycle is frustrating and potentially damaging. A washer that doesn’t drain completely can lead to musty odors, mildew growth, and prevent you from using your machine. It’s crucial to address this issue promptly to avoid further complications and potential water damage to your home. This guide will walk you through common causes and simple troubleshooting steps.
Common Causes of Kenmore Elite Washer Not Draining Completely
Here are some potential culprits behind your Kenmore Elite washer’s drainage issues:
- Clogged Drain Hose: A kinked or blocked drain hose restricts water flow.
- Clogged Drain Pump Filter: Lint, debris, and small objects can accumulate in the drain pump filter, preventing proper drainage.
- Faulty Drain Pump: A worn-out or malfunctioning drain pump might not be able to effectively remove water from the drum.
- Blocked Drain Pipe: The drain pipe where your washer’s hose connects may be clogged.
- Air Lock in the Drain Hose: Air trapped inside the drain hose can prevent the pump from effectively siphoning water.
- Kinked or Bent Drain Hose: Even a slight kink can impede water flow.
- Debris in the Tub: Socks or other small clothing items can block the drain.
- Overuse of Detergent: Excessive suds can interfere with the draining process.
Symptoms Checklist
Check if any of these apply to confirm your washer’s draining problem:
- Water remains in the drum after the wash cycle finishes.
- The washer makes a humming or buzzing noise during the drain cycle, but no water is being pumped out.
- The drain cycle takes an unusually long time.
- Error codes related to draining are displayed on the washer’s control panel.
- Water drains very slowly.
How to Fix Kenmore Elite Washer Not Draining Completely Step-by-Step Guide
Follow these steps to diagnose and resolve the drainage issue:
- Unplug the Washer: Disconnect the washer from the power outlet to prevent electrical shock. This is VERY important.
- Check the Drain Hose for Kinks: Inspect the entire length of the drain hose for any kinks, bends, or obstructions. Straighten any kinks you find.
- Inspect the Drain Hose Connection: Ensure the drain hose is properly connected to both the washer and the drain pipe. Make sure the connections are secure.
- Check the Drain Pipe Opening: Remove the drain hose from the drain pipe. Check the drain pipe opening for any blockage. You might use a stiff wire or a plumbing snake to clear it.
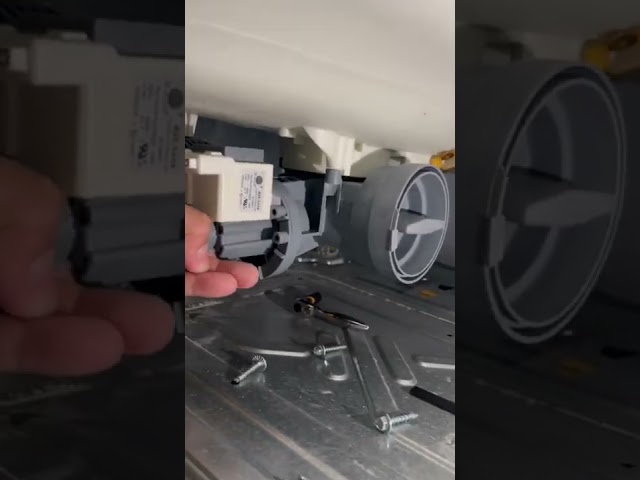
- Locate and Clean the Drain Pump Filter: Refer to your owner’s manual to find the location of the drain pump filter (usually at the bottom front of the washer).
- Prepare for Water Spillage: Place a shallow pan or towels under the drain pump filter area to catch any water that may spill out.
- Open the Drain Pump Filter Housing: Carefully unscrew or unclip the drain pump filter housing.
- Remove the Drain Pump Filter: Gently pull out the filter and clean it thoroughly. Remove any lint, hair, coins, or other debris.
- Rinse the Filter Housing: Rinse the filter housing with water to remove any remaining sediment.
- Reinstall the Drain Pump Filter: Place the clean filter back into the housing and secure it properly.
- Check for Air Lock: If the drain hose is positioned too high, it may cause an air lock. Ensure the hose is not higher than the recommended height (check your owner’s manual).
- Run a Test Cycle: Plug the washer back in and run a short wash cycle to see if the draining issue is resolved. Observe the water as it drains.
- Check for Error Codes: Note any error codes that appear during the test cycle. Consult your owner’s manual to understand the meaning of the codes.
- Reduce Detergent Use: Try using less detergent in future loads to prevent excessive suds.
Fix the Issue Without Buying Parts
Before considering replacements, try these free methods:
- Reset the Washer: Unplug the washer for 1-2 minutes, then plug it back in. This can sometimes reset the system and clear minor errors.
- Clean the Washer Tub: Run an empty cycle with a washing machine cleaner to remove buildup and potential blockages in the tub.
- Inspect the Tub for Obstructions: Carefully check the inside of the tub for any forgotten items that may be obstructing the drain.
- Recalibrate (if possible): Some Kenmore Elite models have a recalibration or diagnostic mode. Check your owner’s manual for instructions on how to initiate it.
When Replacement Might Be Necessary
If the above steps don’t fix the problem, the drain pump itself may be faulty. A new drain pump can cost between $50 and $150 USD, plus labor if you hire a technician. Other parts that might fail (though less commonly) are the drain hose or the water level sensor.
Safety Warning
- Always unplug the washer from the power outlet before attempting any repairs.
- Be careful when handling water, as it can create slippery conditions.
- If you’re not comfortable working with electrical appliances, consult a qualified technician.
- Do not attempt to disassemble the drain pump motor.
Tools You May Need
- Screwdrivers (Phillips and flathead)
- Pliers
- Adjustable wrench
- Shallow pan or towels
- Stiff wire or plumbing snake
- Gloves
FAQ
Here are some common questions related to washer drainage problems:
-
Q: Why is my washer making a loud humming noise but not draining?
A: This usually indicates a blockage in the drain pump or a faulty drain pump motor. -
Q: How often should I clean the drain pump filter?
A: It’s recommended to clean the filter every 1-3 months, depending on usage. -
Q: Can I use vinegar to clean my washing machine?
A: Yes, running an empty cycle with a cup of white vinegar can help remove buildup and odors. -
Q: How do I know if my drain pump is bad?
A: If the pump makes unusual noises, doesn’t pump water effectively, or has visible damage, it’s likely faulty.
Conclusion
Troubleshooting a Kenmore Elite washer that’s not draining completely can seem daunting, but by following these steps, you can often identify and fix the issue yourself. Start with the simplest solutions first, like checking the drain hose and cleaning the filter. If you’re still having trouble after trying these steps, it might be time to call a qualified appliance repair technician. However, armed with this guide, you’re well-equipped to attempt a DIY fix and save yourself the cost of a service call!
Youtube Video:
Looking for more useful options?
Check out recommended resources that others find helpful.