Introduction
Discovering water leaking from your Jenn Air fridge can be concerning. Not only is it a potential slipping hazard, but it can also indicate a bigger problem with your appliance. Water leaks can damage your flooring and lead to mold growth. Often, these leaks happen after refilling ice makers, after power outages, or seemingly out of nowhere. Addressing the issue promptly is essential to prevent further damage and ensure your refrigerator continues to function efficiently.
Common Causes of Jenn Air Fridge Leaking Water
Here are some frequent causes of water leaks in Jenn Air refrigerators:
- Clogged Defrost Drain: This is the most common reason. Ice buildup blocks the drain, causing water to overflow.
- Frozen Water Line: If the water line supplying the ice maker is frozen, melting ice can leak.
- Faulty Water Inlet Valve: This valve controls the water flow to the ice maker and water dispenser. If it’s cracked or malfunctioning, it can leak.
- Cracked or Loose Water Line: The plastic water lines can become brittle over time and crack, leading to leaks. Loose connections also cause problems.
- Damaged Ice Maker: Cracks in the ice maker assembly or a faulty water fill system can cause leaks.
- Leaking Water Filter Housing: The water filter housing can crack or the filter may not be properly seated, causing water to escape.
- Defrost System Malfunction: If the defrost system isn’t working correctly, ice will build up excessively, leading to more water during the defrost cycle.
- Door Seal Problems: A damaged or improperly sealing door gasket can allow warm air to enter, increasing condensation and potential leaks.
- Overfilled Ice Bin: If the ice bin is overly full, ice can melt and drip down.
- Condensation Issues: High humidity in your kitchen can lead to excessive condensation on the fridge’s exterior and interior, resulting in dripping water.
Symptoms Checklist
Check for these signs to accurately diagnose the cause of the leak:
- Puddle of water beneath the fridge.
- Ice buildup inside the freezer.
- Water dripping from the ice maker or water dispenser.
- Water stains on the floor near the fridge.
- Visible cracks or leaks in the water lines.
- Unusual noises coming from the refrigerator.
- The refrigerator is not cooling as effectively as it used to.
How to Fix Jenn Air Fridge Leaking Water Step-by-Step Guide
Follow these steps to troubleshoot and potentially fix the leak:
- Unplug the Refrigerator: For safety, always unplug the fridge before performing any maintenance.
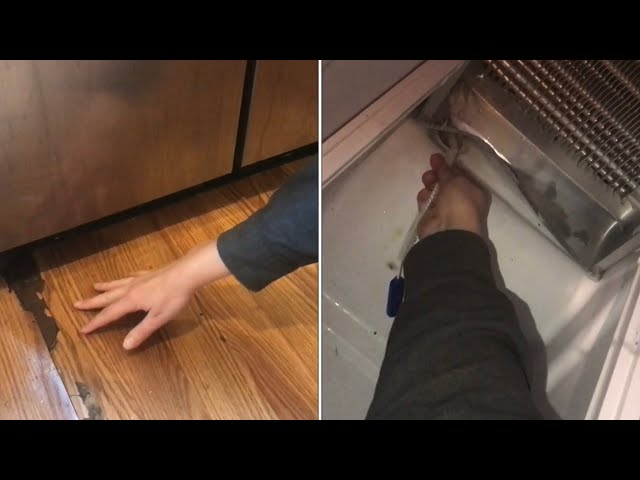
- Locate the Defrost Drain: This is usually located at the back wall inside the freezer compartment, often behind a panel.
- Clear the Defrost Drain: Use a turkey baster filled with warm water or a long, flexible object like a pipe cleaner to flush out any blockage. You can also use a steamer to melt ice.
- Check the Water Line: Inspect the water line that supplies water to the ice maker and water dispenser. Look for cracks, kinks, or loose connections.
- Tighten Water Line Connections: If you find loose connections, carefully tighten them. Don’t overtighten, as this could damage the line.
- Thaw a Frozen Water Line: If the water line is frozen, use a hairdryer on a low setting to gently thaw it. Avoid using excessive heat.
- Inspect the Water Filter Housing: Remove the water filter and inspect the housing for cracks or damage. Ensure the filter is properly seated when replacing it.
- Clean the Condenser Coils: Dust buildup on the condenser coils can reduce efficiency and contribute to condensation. Clean them with a vacuum cleaner brush attachment. These coils are generally located on the back of the fridge or at the bottom, behind a panel.
- Check the Door Seal (Gasket): Inspect the door seal for damage or debris. Clean the seal with warm, soapy water to ensure a tight seal. Replace the gasket if it’s cracked or torn.
- Adjust the Refrigerator Level: Ensure the refrigerator is level. An unlevel fridge can cause water to pool and leak. Use a level tool to check.
- Monitor Ice Maker Fill Level: Ensure that the ice maker is not overfilling the ice bin. If it is, there might be a malfunction in the ice maker’s water fill system.
- Check the Drain Pan: Locate the drain pan (usually at the bottom of the fridge). Empty it if its full and look for cracks.
- Plug the Refrigerator Back In: After completing the inspection and cleaning, plug the refrigerator back in and monitor it for leaks.
- Give it Time: It might take a few hours for the refrigerator to return to its normal operating temperature. Continue to monitor for any signs of leaks.
Fix the Issue Without Buying Parts
Sometimes, you can resolve the leak without buying anything:
- Refrigerator Reset: Unplug the refrigerator for 10 minutes to reset its systems.
- Deep Cleaning: Thoroughly clean the interior of the refrigerator, paying attention to any areas where condensation might be forming.
- Check Temperature Settings: Ensure the temperature settings are appropriate for your climate and food storage needs. Extremely cold temperatures can lead to excessive ice buildup.
- Maintain Airflow: Don’t overpack the refrigerator. Proper airflow is essential to prevent temperature fluctuations and condensation.
- Inspect for Obstructed Vents: Make sure vents arent blocked by food containers.
When Replacement Might Be Necessary
If the leak persists after trying these steps, a replacement part may be needed. The water inlet valve, ice maker assembly, or even the entire refrigerator might require replacement.
- Water Inlet Valve: $50 – $150
- Ice Maker Assembly: $100 – $300
- Professional Repair Labor: $100 – $400
In severe cases, the cost of repair may exceed the value of the refrigerator, making replacement a more sensible option.
Safety Warning
Observe these precautions:
- Always unplug the appliance before any inspection or repair.
- Be cautious of wet floors to avoid slips and falls.
- Avoid touching electrical components with wet hands.
- If you are not comfortable with electrical repairs, consult a qualified technician.
Tools You May Need
Here’s a list of tools that might be helpful:
- Screwdrivers (Phillips and flathead)
- Pliers
- Adjustable wrench
- Turkey baster or pipe cleaner
- Hairdryer
- Vacuum cleaner with brush attachment
- Level
- Warm water and mild soap
FAQ
Here are some frequently asked questions:
-
Q: Why is my fridge leaking water after I changed the water filter?
A: Ensure the filter is properly seated and the housing is not cracked. A new filter can sometimes expose a pre-existing crack in the housing. -
Q: How often should I clean the defrost drain?
A: At least every 6 months, or more frequently if you notice ice buildup. -
Q: Can a full freezer cause leaks?
A: While a full freezer is more efficient, overpacking can block vents and disrupt airflow, potentially leading to ice buildup and leaks. -
Q: Why is water leaking only when the ice maker is running?
A: This likely indicates a problem with the water inlet valve or the ice maker itself. Inspect these components for cracks or malfunctions.
Conclusion
Water leaks from your Jenn Air fridge can be frustrating, but with a systematic approach, many issues can be resolved at home. We encourage you to try the steps outlined in this guide. Addressing these problems promptly helps prevent further damage and saves money. However, for complex issues, don’t hesitate to consult a qualified appliance repair technician for professional assistance.
Youtube Video:
Looking for more useful options?
Check out recommended resources that others find helpful.