Ac Unit Hums But Won’T Start: Troubleshooting Tips To Fix The Issue
If your AC unit is humming but won’t start, there are a few potential causes to consider. Here are some possible reasons and troubleshooting steps you can take: 1. Power issue: Check if the unit has power by ensuring it is plugged in and the circuit breaker is not tripped. 2. Capacitor problem: The capacitor may be faulty or worn out. Consider replacing it. 3. Motor issue: The motor might be overheated or burned out. Allow it to cool down or call a professional to inspect and repair it. 4. Thermostat problem: Ensure the thermostat is set correctly and functioning properly. 5. Start relay malfunction: The start relay could be defective, preventing the unit from starting. Consider replacing it. Remember, if you’re unsure or uncomfortable with troubleshooting electrical components, it’s best to contact a professional HVAC technician to ensure safe and proper repairs.
Picture this: it’s a scorching summer day, and you walk into your home, seeking refuge from the blistering heat. You push the thermostat button, eagerly awaiting the cool embrace of your trusty air conditioning unit.
But instead of the refreshing blast of chilled air, you’re met with a disconcerting hum. Your AC unit refuses to start, leaving you sweaty and frustrated.
If you’ve found yourself in this all-too-common predicament, fear not. This article is here to guide you through the troubleshooting process and provide tips to fix your humming AC unit that won’t start. Whether you’re a homeowner or a renter, resolving AC issues and improving indoor comfort are at the top of your priority list.
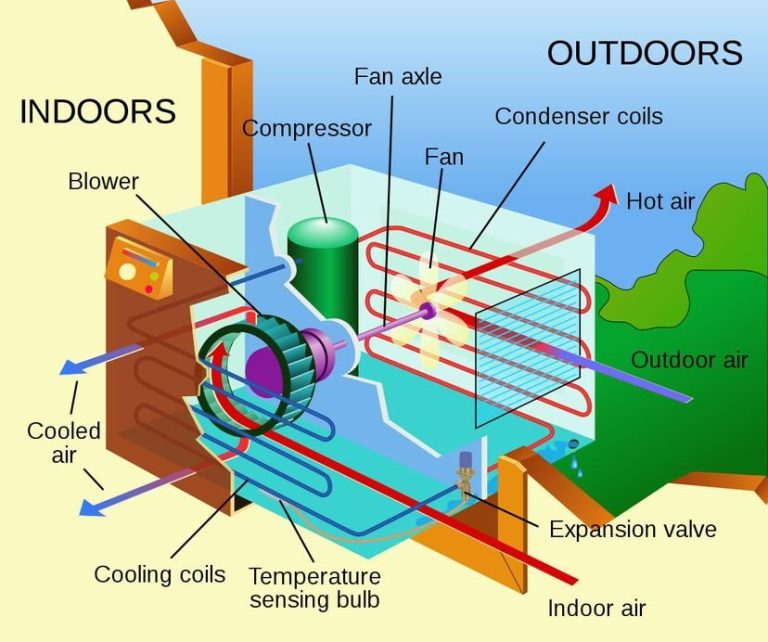
Armed with a basic understanding of HVAC systems, we will unravel the mysteries behind that maddening hum and empower you to restore your cool oasis. So, let’s dive into the world of AC troubleshooting and discover the secrets to getting your unit up and running again.

- ULTRA QUIET – The U-shape design of Midea U Smart Inverter AC uses your window to block noise outside. The highly-efficient inverter system warrants ultra-low noise and vibration, 9x quieter than traditional units with operation as low as 32 dBA.Cooling Watts : 710W, Rated Cooling Amps (AHAM) : 8.78.Airflow (CFM) Roomside (hi low) : 215/150. Refrigerant : R32.
- MORE THAN 35% ENERGY SAVINGS – With the advanced DC Inverter technology, Midea U achieves over 35% energy savings compared to other traditional units. It is the first window AC to obtain the ENERGY STAR Most Efficient Certification
- SMART CONTROL – Midea U Smart Inverter AC is Wi-Fi enabled and can be controlled from anywhere using the MSmartHome app on iOS or Android. You can also use voice commands throughout your house, office, or apartment using Alexa or Google Assistant devices
- FLEXIBLE WINDOW OPENING – The U-shaped design allows your window to open, bringing fresh air into your home and maintaining more of your view when the unit is installed. When the window is closed, the Anti-Theft Mechanism locks the window for added safety
- ROBUST INSTALLATION – Install the included quick-snap bracket, set the unit on the bracket, and secure the sidearms. Then you are all done and ready to enjoy. Available for single-hung or double-hung windows with width 22″-36″, minimal height at 13.75″

- Save Energy and Money: This portable air conditioner until is perfect for targeted spot cooling in rooms up to 450 square feet; Save huge on electricity bills cooling only the room you need versus whole-house central AC
- Control your Cool: Smart WiFi control means you can control the portable ac remotely whether you are working at the office or on vacation; Use voice commands to power on, change temperature, and fan speed settings
- Advanced Safety Features: Thermal overload protection for added safety and peace of mind; Dual Dust Filtration extends product life and performance by keeping internal system clean
- Easy Maintenance: Filter Clean Alert and Washable Filter designed to protect from dust and hair to extend product life and performance; Filter cleans easily under a faucet for easy maintenance
- Designed for Comfort: Enjoy simple digital control with 3 fan speeds, 24 hour energy saving timer, and remote control; Wi-Fi enabled and compatible with Amazon Alexa voice commands

- Multi-Season Comfort – This Midea 12000 BTU air conditioner is better than standard ac units. It will beat the heat in summer with powerful cooling and dehumidification and keep you warm through the fall with supplemental heat. Best for large rooms up to 550 square feet. NOTE: heat pump function will not work if outside temp is 41°F or below..Control Type : Electronic
- Easy To Use – This air conditioner and heat unit comes with an LED display, 5 Modes (Heat, Auto, Cool, Dry, Fan), 3 speed settings (Auto/H/M/L), 24-hr Timer, and ECO energy saver. The Swing button adjusts the louvers up/down to direct the airflow. Control your wifi enabled window ac with heat unit from anywhere with the MSmartHome App, or with your voice via Alexa and Google Assistant. All functions can be set via the control panel, remote control, and app or voice assistant.
- Save Energy Being Cool – Save on energy costs and enjoy ultimate comfort with this energy star certified unit. This energy efficient air conditioner unit is engineered with variable-speed inverter technology that will quickly cool your bedroom or apartment space while using considerably less electricity; up to 35% energy savings compared to the Energy Conservation Standard. Cooling 12,000 BTUs, CEER 13.3, 115V, UL listed, Automatic Shutoff and Defrost Control. Washable filter is easily accessed from front panel for regular cleaning to maintain peak performance.
- Ultra Low Noise Performance – This ac window unit operates at a noise level as low as 45 dBA. It’s such a quiet air conditioner that you will barely notice it, even when it’s on high. Enjoy your Zoom call, watch your favorite TV show, have a conversation. This ac unit for bedroom also creates just the right amount of white noise so you can get some rest.
- Install Specs – This window air conditioner is designed to fit double hung windows with opening widths of 24 to 38.5 inches. Lower sash must open sufficiently to allow a clear vertical opening of 14.5 inches. AC window unit measures 19.41″W x 22.17″D x 13.9″H. Included components: 12000 btu window air conditioner, remote control, installation kit. This ac heater combo window unit is as a close as you can get to a mini split a/c. You may like it so much you just might buy two!

- SMARTCOOL – Midea 14,000 BTU ASHRAE (10,000 BTU SACC) Portable Air Conditioner delivers fast, effective cooling for spaces Up to 345 sq. ft. while providing fan and dehumidification functions in any home, creating a relaxing and comfortable environment
- SMART CONTROL – Control your portable AC from anywhere using the MSmartHome app for iOS and Android. Switch modes, set a schedule, and more. Pair your AC unit with Alexa or Google Assistant devices for voice control options
- EFFORTLESS OPERATION: Enjoy the simplicity of digital controls. This Midea portable air conditioner has an easy-to-read LED display and a compact remote control (batteries included) to easily set the time, temperature, and mode
- EASY INSTALLATION – This unit is easy to install so you can make your home cool and comfortable right away. The exhaust hose, window kit, and instructions are included. No extra tools are needed for assembly
- MULTI SEASON COMFORT: Midea 14,000 BTU Smart Portable AC with Heat offers superior and efficient heating in addition to cooling for optimal comfort in any season

- ULTRA QUIET – This quiet air conditioner reaches sounds as low as 40 dB, underlining GE Profile’s rating as the Quietest Window AC Brand in the US. The ultra quiet operation keeps the air flowing with minimal disruption
- SMART, EASY OPERATION: Integration with the SmartHQ app allows you to monitor, schedule, and control your smart AC unit from anywhere, while compatibility with your favorite devices like Amazon Alexa and Google Assistant makes everyday use easier and more versatile than ever.
- MAXIMUM COMFORT FOR MEDIUM ROOMS: Three fan speeds and four cooling modes provide total flexibility with optimal home comfort and air conditioner efficiency; or set to Eco Mode which automatically turns off the fan and compressor, saving you money on utilities.
- DRY MODE DEHUMIDIFY: This 3-in-1 unit includes dehum mode, which is a built-in air conditioner humidity setting that balances humidity levels in the room to maintain your comfort and make it easy to breathe.
- GE PROFILE 8200 BTU SMART WINDOW AIR CONDITIONER – Designed to efficiently cool rooms up to 350 sq ft; easy installation kit and remote control included so you can start cooling right away
- GE 14,000 BTU SMART PORTABLE AIR CONDITIONER is designed to efficiently cool medium rooms up to 550 sq ft; easy window installation kit with no cutting required included so you can start cooling right away; 9,850 BTU SACC
- 3-IN-1 PORTABLE AIR CONDITIONER- Built-in air conditioning, three fan speeds, and dehumidifying capabilities provide flexible and optimal home comfort; ideal for living rooms, family rooms, and studio apartments
- SMART, EASY OPERATION- Integration with the SmartHQ app allows you to monitor and control your connected AC unit from anywhere, or use the included remote control and digital LED control panel
- AUTO EVAPORATION TECHNOLOGY- Under most room conditions, the AC will evaporate any water the unit collects while cooling, so there is no need to drain or collect excess water
- ADDITIONAL FEATURES- Easy-roll casters, continuous fan mode, removeable and washable filter, 24-hour on/off timer, auto louver, and auto restart provide ease of use and maintenance

- Powerful Air Cooler: Indoor evaporative air cooler or swamp cooler ideal for use in the southwest and Midwest regions of the US – Performs best in hot/dry climates where humidity levels are <60%
- Convenient Placement: Super low power consumption 288W & powerful 806 CFM airflow ideal for spot cooling small to medium spaces such as living room, bedroom, den, covered patio, garage
- Evaporative Cooler Features: Carbon Dust Air Filter, Remote Control, Low water alarm, energy saving timer, Adjustable humidification dial & Ice compartment and a detachable tank for easy maintenance
- Versatile Swamp Cooler: Moist, cool breeze can cool you down & be used as humidification during winter months
- Not an air conditioner and not just a fan : Reduces temperature through environmentally friendly water evaporation; air cooler is not an air conditioner and should not be expected to cool as efficiently as a refrigerated AC

- SPEED CONTROLLER FOR BOOSTER FANS: Designed and Tested to Work with TerraBloom Booster Fans. This Speed Controller will allow you to slow down your 6″, 8″ or 10″ booster fans by 25-40% percent from Max Speed. 4″ Booster Fans are very quiet even at Max Speed, this controller will only let you slow it down by only 10-15% due to low powered nature of its motor.
- CHECK FOR COMPATIBILITY: This Fan Speed Controller won’t work with Box Fans or Any Fans which have a built-in speed controller or speed settings. Mixing two speed controllers on one fan causes compatibility issues. Use with fans not manufactured by TerraBloom or appliances other than fans is subject to compatibility, flawless performance not guaranteed in such applications.
- NOTE ON “HUM” SOUND: If you slow down your fan too much, it’ll start making “humming” noise, which signals that the motor is not getting enough power. Each Fan has a speed range that it can operate in, typically the more powerful the motor, the larger the speed range it will have until it starts to “hum”. Slowly turn the knob the Highest point to gauge the range of your fan’s motor, its lowest safe speed is right before motor starts to “hum”.
- KEY STATS: Current Capacity: 3.5A, Voltage Capacity: 120V, Rated for up to: 350W. Durable 3-Pole Grounded Plug Construction, No Extra Wires To Deal With. This speed controller’s “High”, “Med”, “Low” marks are for reference purpose only. Some Fans have very little adjustability range due to their motors’ constrains, such units can only be adjusted within “High” zone of the controller and will “hum” on Medium and Low settings
- WARRANTY: We provide 1 year warranty on these variable fan speed controllers. You can exchange or return the item for any reason within 30 days from purchase date
- Save Energy, Save Money: This portable air conditioner is perfect for targeted spot cooling in rooms up to 450 square feet, save huge on electricity bills cooling only the room you need versus whole-house central AC
- Control from Anywhere: Smart WiFi control means you can control the portable ac remotely whether you are working at the office or simply 2 levels away from your basement; Use voice commands to power on, change temperature and fan speed settings
- Advanced Safety Features: Thermal overload protection for added safety; Dual Dust Filtration extends product life and performance by keeping internal system clean
- Easy Maintenance: The filter clean alert and washable filter are designed to protect from dust and hair to extend portable ac unit life and performance; Filter cleans easily under a faucet
- Designed for Comfort: Enjoy simple digital control with 3 fan speeds, 24 hour energy saving timer and remote; Wi-Fi enabled and compatible with Amazon Alexa voice commands

- 【1,500-2,000 sq. ft. Spaces】The HUMILABS dehumidifier can removing up to 30 pints of water per day (30 pints under 90°F, 90% RH condition) and adjust humidity from 30% to 80%. It is the best dehumidifiers for home, basement, office, living room, bedroom, garage, laundry room, cellar, etc., fits any medium or larger room.
- 【24-hour Timer】The dehumidifiers With 360° rotatable wheels and ergonomically lift up handles, This HUMILABS dehumidifier is easier to move than larger dehumidifiers, you can move around this dehumidifier easily without scratching the floor. A quiet fan that won’t disturb you when you sleep or at work, adjustable fan speeds for multiple choices. 24-hour Timer Setting for preset operation and reduced energy consumption.
- 【Auto & Manual Drainage】Manual Drainage: The water tank is 0.528 gallon when it reaches maximum capacity, the “Full “indicator will light up as well as an alarm will beep for 20 seconds the dehumidifier will stop working automatically. Auto Drainage: This basement dehumidifier is equipped with a 3.3ft You can directly attach to the drainpipe hole on the left side of the dehumidifier to achieve continuous drainage. No worry about the risk of the water overflowing.
- 【Laundry Dry & Ultra-Quiet Night Mode】Specially designed laundry dry mode is perfect on wet weathers or seasons, it removes the excessive moisture of your clothes and keeps them dry & clean. Two different fan speeds can meet different needs.The 36dB low-noise design keeps you away from disturbing noises while sleeping or studying. The auto defrost function prevents the collected water from being frozen and doing harm to the machine.
- 【Digital display】This small dehumidifier with digital display can provide convenient and accurate humidity readings. Unlike most dehumidifiers that are clunky, with the 360° rotatable wheels, you can move around this dehumidifier easily. it has a 3 different color lights (Blue, Green and Red) that can directly display the environmental humidity. Our dehumidifier has a warranty period of one year.
I. Common Causes for an AC Unit Humming but Not Starting
When your AC unit hums but won’t start, there are several potential causes to consider. Understanding these common issues will help you troubleshoot and resolve the problem effectively.
A. Lack of Power Supply
One of the most basic reasons for an AC unit not starting is a lack of power supply. This can occur if the unit is not properly connected to a power source or if there is an issue with the electrical supply.
B. Faulty Capacitor
The capacitor is a crucial component of the AC unit’s electrical system. It stores and releases electrical energy to help start the compressor and fan motors. If the capacitor is faulty, it can cause the unit to hum but not start.
C. Defective Compressor Motor
The compressor motor is responsible for circulating refrigerant in the AC unit. If the compressor motor is defective or damaged, it can prevent the unit from starting properly.
D. Problems with the Fan Motor
The fan motor helps to circulate air and maintain airflow in the AC unit. If the fan motor is malfunctioning or not working at all, it can result in the unit humming but not starting.
E. Malfunctioning Thermostat
The thermostat is the control center of the AC unit. It signals when the unit should turn on and off based on temperature settings. If the thermostat is malfunctioning or not calibrated correctly, it can prevent the unit from starting.
II. Troubleshooting Steps for an AC Unit That Hums but Won’t Start
Now that we’ve identified the common causes behind an AC unit humming but not starting, let’s explore the troubleshooting steps to resolve the issue.
A. Safety Precautions Before Troubleshooting
Before delving into any troubleshooting steps, it’s essential to prioritize safety. Make sure to turn off the power supply to the AC unit and follow safety guidelines to prevent any electrical accidents.
B. Checking the Power Supply
Start by checking the power supply to ensure that the AC unit is receiving electricity.
1. Verifying Power Source
Check if the AC unit is plugged in and if the power source is functioning correctly. Sometimes, simple issues like loose plugs or power outages can disrupt the unit’s power supply.
2. Testing the Circuit Breaker
Inspect the circuit breaker panel and check if any of the breakers are tripped. If a breaker is tripped, reset it and see if that resolves the issue. If the breaker continues to trip repeatedly, it may indicate a more significant electrical problem. In such cases, it’s best to consult a professional electrician.
3. Checking the Fuse Box
Inspect the fuse box or electrical panel to see if any fuses are blown. If you find any blown fuses, replace them with new ones of the same rating. However, if the fuses blow again, there may be an underlying issue that needs professional attention.
4. Inspecting the Electrical Connections
Examine the AC unit’s electrical connections, including the wiring, terminals, and connectors. Loose or corroded connections can disrupt the flow of electricity and prevent the unit from starting. Tighten any loose connections and clean any corrosion to ensure proper electrical contact.
C. Inspecting the Capacitor
Next, focus on inspecting and testing the capacitor, as a faulty capacitor can cause the AC unit to hum but not start.
1. Identifying the Capacitor
Locate the capacitor in the AC unit. It is typically a cylindrical or oval-shaped component with wires attached to it.
2. Checking for Physical Damage
Visually inspect the capacitor for any signs of physical damage such as bulging, leaking, or burning. If you notice any of these issues, the capacitor likely needs to be replaced.
3. Capacitor Testing Using a Multimeter
If the capacitor appears undamaged, you can test its functionality using a multimeter. Set the multimeter to the capacitance testing mode and follow the manufacturer’s instructions to test the capacitor’s capacitance. If the reading is significantly lower than the specified capacitance value, the capacitor may be faulty and should be replaced.
D. Evaluating the Compressor Motor
The compressor motor plays a vital role in the functionality of the AC unit. To evaluate its condition, follow these steps:
1. Understanding Compressor Motor Functionality
Gain a basic understanding of how the compressor motor operates and its various components. This will help you identify any potential issues.
2. Listening for Unusual Sounds
Turn on the AC unit and listen for any unusual sounds coming from the compressor motor. Grinding, rattling, or buzzing noises may indicate motor issues and can prevent the unit from starting.
3. Checking the Motor Windings
Using a multimeter, measure the resistance of the compressor motor’s windings. Refer to the manufacturer’s specifications for the expected resistance values. If the resistance readings are significantly different from the specified values or if they show an open circuit, the compressor motor may be defective and require professional attention.
4. Capacitor Testing for the Compressor Motor
As mentioned earlier, the compressor motor relies on the capacitor for starting. If the capacitor is faulty, it can prevent the compressor motor from starting. Therefore, it’s crucial to test the capacitor as mentioned in section C above.
E. Assessing the Fan Motor
The fan motor is responsible for circulating air and ensuring proper airflow in the AC unit. Here’s how you can evaluate the fan motor:
1. Examining the Fan Blades for Obstructions
Check the fan blades for any obstructions such as debris or dirt. Clear any blockages and ensure that the blades can rotate freely.
2. Testing the Fan Motor Using a Multimeter
Using a multimeter, measure the resistance of the fan motor. Compare the readings with the manufacturer’s specifications. If the resistance values are significantly different or show an open circuit, the fan motor may be faulty and require repair or replacement.
3. Replacing or Repairing the Fan Motor if Necessary
If the fan motor is deemed defective, you may need to replace it with a new one. Consult a professional HVAC technician for assistance with repairing or replacing the fan motor.
F. Verifying the Thermostat Functionality
The thermostat is responsible for signaling the AC unit to start and stop based on temperature settings. Ensure that the thermostat is functioning correctly by following these steps:
1. Checking the Thermostat Settings
Verify that the thermostat is set to the desired temperature and cooling mode. Sometimes, incorrect settings can prevent the AC unit from starting.
2. Testing the Thermostat Using a Multimeter
Set the multimeter to the appropriate voltage setting and check for 24 volts of power at the thermostat terminals. If there is no voltage or insufficient voltage, the thermostat may be faulty.
3. Replacing or Recalibrating the Thermostat
If other troubleshooting steps don’t resolve the issue, consider replacing or recalibrating the thermostat. Consult a professional HVAC technician to ensure proper installation and calibration.
III. Repairing and Resolving Issues
A. Replacing a Faulty Capacitor
If the capacitor is found to be faulty, it’s crucial to replace it with a new one. Here’s how to do it:
1. Capacitor Selection and Safety Tips
Choose a replacement capacitor that matches the specifications of the old one. Ensure that the power supply is turned off before starting the replacement process.
2. Disconnecting Power Before Replacement
Switch off the circuit breaker or disconnect the power supply to the AC unit before replacing the capacitor. This will prevent electrical accidents during the replacement process.
3. Removing and Installing a New Capacitor
Take note of the wire connections to the faulty capacitor and carefully remove them. Install the new capacitor by connecting the wires to the appropriate terminals, following the manufacturer’s instructions and the labeling on the capacitor.
B. Repairing or Replacing a Defective Compressor Motor
If the compressor motor is determined to be defective, it may require repair or replacement. Here’s what you need to know:
1. Identifying Compressor Motor Issues
If you suspect a problem with the compressor motor, it’s best to seek professional assistance. HVAC technicians have the knowledge and skills to diagnose and repair motor-related issues.
2. Seeking Professional Assistance for Repairs
Contact a reputable HVAC technician who specializes in compressor motor repairs. They will assess the issue and provide the necessary repairs or replacements.
3. Replacing the Compressor Motor if Necessary
In some cases, the compressor motor may need to be replaced entirely. This is a complex task best left to trained professionals with the necessary equipment and expertise.
C. Repairing or Replacing a Malfunctioning Fan Motor
If the fan motor is malfunctioning, follow these steps to address the issue:
1. Troubleshooting Fan Motor Problems
Check for any loose wires, damaged connectors, or faulty components associated with the fan motor. Tighten connections or replace damaged parts as needed.
2. Seeking Professional Assistance for Repairs
If you are unable to identify or resolve the problem with the fan motor, it’s advisable to seek professional assistance. HVAC technicians can diagnose the issue accurately and perform the necessary repairs or replacements.
3. Replacing the Fan Motor if Necessary
If the fan motor is beyond repair, it may need to be replaced. A qualified HVAC technician can recommend a suitable replacement and install it correctly.
D. Rectifying Thermostat Issues
If the thermostat is causing the AC unit to hum but not start, follow these steps to address the problem:
1. Troubleshooting Common Thermostat Problems
Check for loose connections, dead batteries, or faulty wiring associated with the thermostat. Rectify any identified issues to ensure proper functionality.
2. Adjusting or Recalibrating the Thermostat
If the thermostat settings are incorrect or if it’s not calibrated properly, adjust or recalibrate it according to the manufacturer’s instructions. This may involve resetting the temperature differential or leveling the thermostat.
3. Replacing the Thermostat as a Last Resort
If all other troubleshooting steps fail to resolve the issue with the thermostat, consider replacing it. Make sure to consult a professional HVAC technician for assistance with proper installation.
IV. Preventive Maintenance to Avoid AC Unit Humming and Startup Problems
A. Regular Cleaning and Inspection
Maintaining a clean and properly functioning AC unit is crucial to prevent humming and startup issues. Follow these steps for regular cleaning and inspection:
1. Clearing Debris Around the Unit
Keep the area around the AC unit clear of debris such as leaves, branches, and dirt. This will ensure proper airflow and prevent obstructions.
2. Cleaning the Condenser and Evaporator Coils
Regularly clean the condenser and evaporator coils to remove dust, dirt, and debris buildup. This will improve the efficiency of the unit and prevent potential issues.
3. Checking and Changing Air Filters Regularly
Inspect and clean or replace the air filters regularly. Clogged or dirty air filters can restrict airflow and strain the AC unit, leading to humming and startup problems.
B. Lubricating Moving Parts
To ensure smooth operation, certain moving parts of the AC unit may require lubrication. Here’s how to do it:
1. Identifying Parts That Require Lubrication
Review the AC unit’s user manual or consult a professional technician to identify the moving parts that require lubrication. Common examples include bearings and motors.
2. Using the Appropriate Lubricant
Choose a lubricant recommended by the manufacturer for the specific parts. Using the wrong lubricant can cause damage and affect the unit’s performance.
3. Lubricating the Parts According to Manufacturer Guidelines
Apply the lubricant to the designated parts according to the manufacturer’s guidelines. Follow the recommended frequency of lubrication to ensure optimal performance.
C. Professional Maintenance and Tune-ups
Regular professional maintenance and tune-ups are essential to keep your AC unit operating efficiently. Consider the following:
1. Scheduling Annual Maintenance Visits
Contact a reputable HVAC service provider to schedule an annual maintenance visit. During these visits, technicians will inspect, clean, and tune-up the AC unit to ensure optimal performance.
2. Importance of Professional Inspection and Cleaning
Professional inspections and cleanings go beyond what homeowners can do themselves. Technicians have the expertise to identify potential issues and address them before they become major problems.
3. Addressing Potential Issues Before They Become Major Problems
Regular maintenance visits allow HVAC technicians to identify and address potential issues with your AC unit. This proactive approach can help prevent humming and startup problems from occurring in the first place.
V. Conclusion
Dealing with an AC unit that hums but won’t start can be frustrating, especially during scorching hot days. By understanding the common causes behind this issue and following the troubleshooting steps outlined in this article, you can effectively resolve the problem and restore your cool oasis.
Remember to prioritize safety and seek professional assistance when necessary. Additionally, implementing preventive maintenance measures such as regular cleaning, lubrication, and professional tune-ups will help prevent humming and startup problems in the future.
Now that you’re armed with knowledge and troubleshooting tips, you can confidently take control of your AC unit and enjoy uninterrupted cool comfort.
AC Wont Turn On – The Most Common Fix
Frequently Asked Questions (FAQ)
Why is my AC unit humming but not starting?
Can I fix the humming AC unit myself?
How much will it cost to repair a humming AC unit?
Is it safe to continue using the AC unit if it is humming but not starting?
How can I prevent my AC unit from humming but not starting?
Final Summary: Troubleshooting and resolving AC unit humming and startup problems.
In conclusion, when your AC unit hums but won’t start, there are several potential causes to consider. Common issues include a lack of power supply, a faulty capacitor, a defective compressor motor, problems with the fan motor, and a malfunctioning thermostat.
To troubleshoot and resolve these issues, it is important to follow a series of steps, such as checking the power supply, inspecting the capacitor, evaluating the compressor and fan motors, and assessing the thermostat functionality. In some cases, repairing or replacing certain components may be necessary.
For example, a faulty capacitor may need to be replaced, a defective compressor motor may require repair or replacement by a professional technician, and a malfunctioning fan motor may need to be repaired or replaced. If the thermostat is causing the issue, adjusting or recalibrating it may resolve the problem, but in some cases, replacing it is necessary. To avoid AC unit humming and startup problems, preventive maintenance is key.
Regular cleaning and inspection, lubrication of moving parts, and scheduling professional maintenance and tune-ups are important to keep your AC unit operating efficiently. By understanding the common causes and following the troubleshooting steps outlined in this article, you can effectively resolve the issue of an AC unit humming but not starting. Remember to prioritize safety and seek professional assistance when necessary.