Introduction
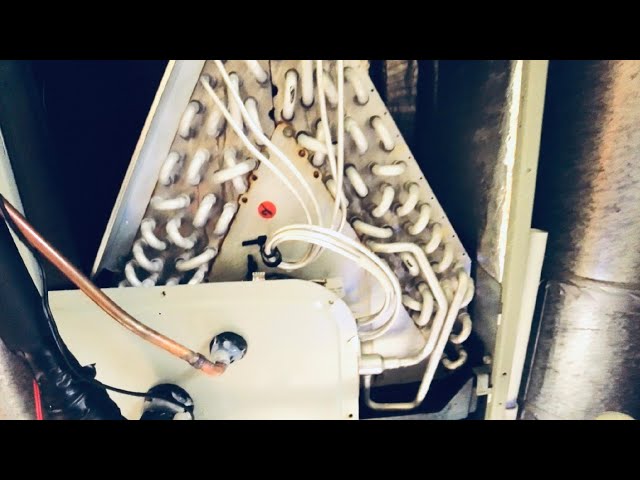
Finding water dripping from your indoor air conditioning unit can be alarming. This often indicates an issue with the evaporator coil, a crucial component responsible for cooling the air. While some condensation is normal, excessive dripping signifies a problem. Left unaddressed, this can lead to mold growth, water damage to your home, and reduced cooling efficiency. It’s crucial to investigate and resolve the dripping as soon as possible to prevent further complications and ensure your AC system functions optimally.
Common Causes of ac evaporator coil dripping water
Here are several common reasons why your AC evaporator coil might be dripping water:
- Clogged Air Filter: A dirty air filter restricts airflow, causing the coil to freeze and then melt, leading to excessive dripping.
- Frozen Evaporator Coil: Low refrigerant levels, poor airflow, or a malfunctioning blower motor can cause the coil to freeze.
- Low Refrigerant: Insufficient refrigerant reduces the coil’s ability to absorb heat properly, resulting in freezing and subsequent dripping.
- Dirty Evaporator Coil: Dust and debris accumulation on the coils surface hinders heat transfer, potentially causing ice formation.
- Blocked Drain Line: A clogged drain line prevents condensation from properly draining away, causing it to overflow and drip.
- Blower Motor Problems: A failing blower motor reduces airflow across the coil, increasing the risk of freezing.
- Incorrect Thermostat Setting: Setting your thermostat too low can overwork the AC unit and lead to coil freezing.
- Leaky Ductwork: Air leaks in ductwork can cause the AC to work harder, potentially leading to a frozen coil.
Symptoms Checklist
Look out for these indicators that suggest a problem with your AC evaporator coil:
- Water dripping from the indoor AC unit.
- Ice formation on the evaporator coil.
- Reduced cooling efficiency or warm air blowing from vents.
- Musty odor coming from the vents.
- Visible mold growth around the indoor unit.
- Unusual noises from the AC system.
- Higher than usual energy bills.
How to Fix ac evaporator coil dripping water Step-by-Step Guide
Here’s a step-by-step guide to troubleshoot the issue:
- Turn off the AC: Switch off your AC system at the thermostat and the breaker to prevent further damage.
- Check the Air Filter: Remove and inspect the air filter. If it’s dirty, replace it with a new one.
- Thaw a Frozen Coil (if applicable): If you see ice on the coil, allow it to thaw completely. You can speed up the process by using a hairdryer (on low setting) or a fan.
- Locate the Drain Line: The drain line is usually a PVC pipe located near the indoor unit.
- Check the Drain Line for Clogs: Look for any visible blockages in the drain line opening.
- Clear the Drain Line: Use a wet/dry vacuum to suck out any debris from the drain line opening. Alternatively, you can use a stiff wire or a plumbing snake to break up the clog.
- Flush the Drain Line: Pour a cup of vinegar into the drain line to kill mold and bacteria. Let it sit for about 30 minutes, then flush it with water.
- Inspect the Evaporator Coil: Carefully examine the evaporator coil for any visible dirt or debris.
- Clean the Evaporator Coil: Use a soft brush or a vacuum with a brush attachment to gently clean the coil. You can also use a specialized coil cleaner (follow the product instructions).
- Check the Blower Motor: Ensure the blower motor is running smoothly. If it’s making unusual noises or not running at all, it might need professional attention.
- Turn the AC Back On: After completing these steps, turn the AC system back on and monitor it for any further dripping.
- Monitor for Freezing: Keep an eye on the evaporator coil for ice formation. If it freezes again, there could be an underlying issue like low refrigerant.
Fix the Issue Without Buying Parts
Many times, you can resolve dripping issues without purchasing new parts:
- Regular Filter Changes: Maintaining a clean air filter is crucial. Replace it every 1-3 months, depending on usage.
- Routine Drain Line Cleaning: Flush the drain line with vinegar every few months to prevent clogs.
- Keep the Area Clean: Ensure the area around the indoor unit is free of dust and debris.
- Proper Thermostat Settings: Avoid setting your thermostat too low, as this can overwork the AC and potentially cause freezing.
- Visual Inspection: Regularly inspect the indoor unit for signs of leaks, ice formation, or mold growth.
When Replacement Might Be Necessary
In some cases, replacement might be the only solution:
- Evaporator Coil Damage: If the coil is severely corroded or damaged, replacement is necessary.
- Refrigerant Leaks: If you suspect a refrigerant leak (constant freezing or poor cooling), a professional should locate and repair the leak. If the coil itself is leaking, it may need replacement.
- Old Age: If your AC system is very old (15+ years) and experiencing frequent problems, replacing the entire unit might be more cost-effective in the long run.
Replacement costs can vary depending on the extent of the repair and the unit type. Expect to pay anywhere from $700 to $2500 for evaporator coil replacement by a professional. A full AC system replacement will be more.
Safety Warning
- Always turn off the AC system at the thermostat and the breaker before performing any maintenance.
- Avoid touching electrical components with wet hands.
- Be careful when using tools around the AC unit to avoid damaging any parts.
- If you are uncomfortable with any of these steps, contact a qualified HVAC technician.
Tools You May Need
- Screwdriver
- Wet/Dry Vacuum
- Stiff Wire or Plumbing Snake
- Soft Brush or Vacuum with Brush Attachment
- Vinegar
- Air Filter
FAQ
Here are some common questions about dripping AC evaporator coils:
- Q: How often should I clean my AC evaporator coil?
A: At least once a year, or more often if you live in a dusty environment.
Q: Can I use bleach to clean the drain line?
A: It’s generally not recommended to use bleach, as it can damage the drain line. Vinegar is a safer and effective alternative.
Q: Why is my AC dripping even after I cleaned the drain line?
A: There could be another clog further down the line, or there might be a separate issue like low refrigerant or a frozen coil.
Q: How do I know if my AC has a refrigerant leak?
A: Signs of a refrigerant leak include reduced cooling efficiency, ice formation on the coil, and higher than usual energy bills. A professional can confirm the leak and repair it.
Conclusion
Addressing a dripping AC evaporator coil promptly is essential for maintaining a comfortable and healthy home. By following these troubleshooting steps, you can often resolve the issue yourself and prevent further damage. However, if you’re unsure about any of these steps or if the problem persists, don’t hesitate to contact a qualified HVAC technician for assistance. Starting with these simple checks can save you money and ensure your AC system continues to function efficiently.
Youtube Video:
Looking for more useful options?
Check out recommended resources that others find helpful.