
Introduction
Is your refrigerator warm while the freezer works fine? A prime suspect could be the evaporator coil. This coil, located inside your refrigerator, is responsible for absorbing heat and keeping your food cold. When it’s not getting cold enough, your food can spoil quickly, costing you money and potentially posing a health risk. This problem often arises gradually, so it’s important to address it promptly to prevent further issues and unnecessary food waste.
💡 Technical Key Takeaways:
- Core Focus: Diagnostic schematic and terminal connection layout for Refrigerator Evaporator Coil Not Getting Cold.
- Target Scope: Field technicians, automotive DIYers, and residential/commercial electricians.
- Safety Rule: Always disconnect the primary power source/battery terminal and verify zero voltage with a multimeter before touching wires.
Common Causes of Refrigerator Evaporator Coil Not Getting Cold
Here are some typical reasons why your evaporator coil might not be cooling down:
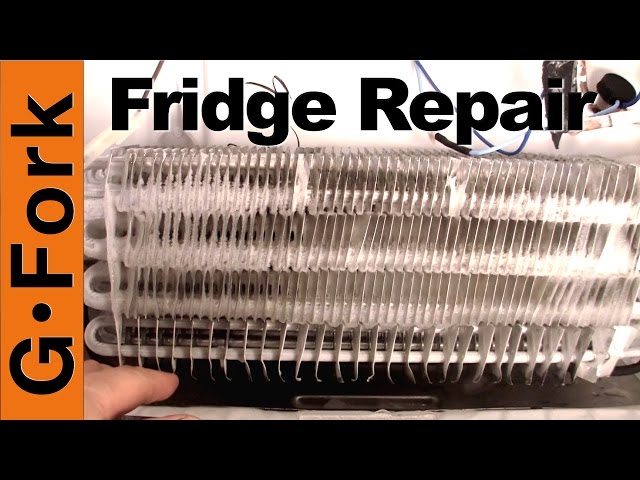
- Frost Buildup: Excessive frost on the coil acts as insulation, preventing it from cooling effectively. This is often caused by a faulty defrost system.
- Defrost System Failure: The defrost system, including the defrost timer, heater, and thermostat, melts away frost. If any of these components fail, frost builds up.
- Faulty Defrost Timer: The defrost timer controls when the defrost cycle starts. A malfunctioning timer might not initiate the defrost cycle at all.
- Defective Defrost Heater: This heater melts the frost on the evaporator coil. If it burns out, frost accumulates.
- Bad Defrost Thermostat: This thermostat monitors the temperature of the evaporator coil and signals the defrost heater to turn off when the frost is melted. A faulty thermostat can prevent the heater from working.
- Blocked Airflow: Obstructions like overpacked shelves or items blocking the vents can restrict airflow over the coil, reducing its cooling efficiency.
- Dirty Condenser Coils: Located on the back or bottom of the refrigerator, dirty condenser coils reduce the refrigerator’s ability to release heat, impacting the entire cooling process.
- Damaged Door Seals: Worn or damaged door seals allow warm air to enter the refrigerator, forcing the system to work harder and potentially leading to frost buildup on the evaporator coil.
- Faulty Evaporator Fan Motor: The evaporator fan circulates air across the evaporator coil. If it’s not working, cold air won’t be distributed properly.
- Refrigerant Leak: Although less common, a refrigerant leak can reduce the system’s ability to cool, leading to a warm refrigerator. This typically requires professional repair.
Symptoms Checklist
Check if you notice any of these signs:
- Refrigerator compartment is warmer than usual.
- Freezer works normally.
- Frost buildup on the back wall of the refrigerator compartment.
- The refrigerator runs constantly.
- You hear unusual noises (clicking, buzzing) coming from the refrigerator.
- Food spoils faster than usual.
How to Fix Refrigerator Evaporator Coil Not Getting Cold Step-by-Step Guide
Follow these steps to troubleshoot the issue:
- Unplug the Refrigerator: For safety, always unplug the refrigerator before starting any repairs.
- Locate the Evaporator Coil: Typically, the evaporator coil is located behind a panel inside the refrigerator compartment (usually the back wall).
- Inspect for Frost Buildup: Remove the panel and check the evaporator coil for excessive frost. A thin layer is normal; thick frost indicates a problem.
- Manually Defrost: If there’s heavy frost buildup, manually defrost the refrigerator. Leave the door open (with a towel underneath to catch water) for several hours or use a hairdryer (on a low setting and keeping a safe distance) to melt the frost.
- Clean the Condenser Coils: Locate the condenser coils (usually on the back or bottom of the refrigerator) and clean them with a vacuum cleaner brush attachment to remove dust and debris.
- Check the Door Seals: Inspect the door seals for cracks, tears, or gaps. Clean the seals with warm, soapy water to remove any dirt or food particles that might be preventing a tight seal.
- Test the Evaporator Fan: With the refrigerator running (after defrosting), listen for the evaporator fan. If you don’t hear it running, it might be faulty.
- Inspect the Defrost Timer: The defrost timer is usually located behind the kick plate at the bottom front or on the back of the refrigerator. Try advancing the timer manually (it’s a knob) to see if the defrost cycle starts (you might hear a click and the compressor will shut off).
- Check the Defrost Heater: (This requires some electrical testing knowledge and a multimeter. If you’re not comfortable, skip this step.) Locate the defrost heater (usually near the evaporator coil) and test it for continuity with a multimeter. If it shows no continuity, it’s likely faulty.
- Check the Defrost Thermostat: (Similar to the heater, this requires electrical testing.) Locate the defrost thermostat (also near the evaporator coil) and test it for continuity. It should show continuity when cold. If it doesn’t, it’s likely faulty.
- Reassemble and Monitor: After completing these steps, reassemble the refrigerator and monitor its performance.
- Allow Time to Cool: It can take several hours for the refrigerator to reach its normal operating temperature after troubleshooting.
Fix the Issue Without Buying Parts
Before resorting to replacement parts, try these free methods:
- Refrigerator Reset: Unplug the refrigerator for 30 minutes to reset the system.
- Thorough Cleaning: Clean the inside of the refrigerator and remove any obstructions blocking airflow.
- Check Temperature Settings: Ensure the temperature settings are correct (usually between 35-38F for the refrigerator and 0-5F for the freezer).
- Inspect Vent Placement: Avoid placing items directly in front of air vents, as it will limit airflow.
- Proper Loading: Avoid overloading the refrigerator, as this can restrict airflow and reduce cooling efficiency.
- Seal Inspection: A dollar bill placed between the door and the refrigerator frame should offer resistance when pulling it out. Little to no resistance suggests the seal needs to be replaced.
When Replacement Might Be Necessary
If the evaporator fan motor, defrost heater, or defrost thermostat are confirmed faulty after testing and the simpler fixes haven’t worked, replacement might be necessary. The cost of these parts typically ranges from $30 to $100 each. A refrigerant leak almost always requires a professional technician as it is illegal in the US for non-certified personal to handle refrigerant. The cost of repairing a refrigerant leak can vary greatly, but can range from $200 to $500 or more, depending on the complexity of the repair and the cost of refrigerant. For more related activities, check out our Beverage Fridge Not Cooling.
Safety Warning
- Always unplug the refrigerator before performing any repairs.
- Avoid working on electrical components if you are not comfortable with electrical troubleshooting. Call a qualified technician.
- Be careful when using a hairdryer to defrost, keeping a safe distance to avoid damaging the refrigerator.
- Do not touch any electrical components with wet hands.
- Keep children and pets away from the work area.
Tools You May Need
- Screwdrivers (Phillips and flathead)
- Vacuum cleaner with brush attachment
- Multimeter (for electrical testing)
- Towel
- Warm, soapy water and a sponge
FAQ
Here are some frequently asked questions:
- Q: Why is my freezer cold but the refrigerator is warm?
- A: This often indicates a problem with the airflow between the freezer and refrigerator compartments or an issue with the defrost system.
- Q: How do I know if my defrost heater is working?
- A: You can test it for continuity using a multimeter. If it shows no continuity, it’s likely faulty.
- Q: How often should I clean my refrigerator’s condenser coils?
- A: It’s recommended to clean the condenser coils every 6-12 months.
- Q: Can I fix a refrigerant leak myself?
- A: No, repairing a refrigerant leak requires specialized equipment and certification. Contact a qualified technician.
- Q: The back panel inside my fridge is bulging, is this normal?
- A: No, this means there is probably frost building up behind it. Follow the guide above.
Conclusion
Troubleshooting a refrigerator evaporator coil that’s not getting cold can seem daunting, but by following these steps, you can often identify and fix the problem yourself. Remember to prioritize safety and take your time. If you’re uncomfortable with any of the steps or the issue persists, don’t hesitate to contact a qualified appliance repair technician for assistance. You’ve got this!
Youtube Video:
Quick Wiring Specifications & Terminal Guide
| Component / Circuit | Standard Wire Gauge | Recommended Protection |
|---|---|---|
| Control & Trigger Signals | 18 – 20 AWG | 5A – 7.5A Inline Fuse |
| Standard Auxiliary Load | 14 – 16 AWG | 15A – 20A Circuit Breaker |
| Main Power Feed / Supply | 10 – 12 AWG | 30A – 40A Heavy-Duty Relay |
Images References
Looking for more diagnostic guides? Explore our complete Refrigerator Problems 1 section for step-by-step troubleshooting solutions.
