
Introduction
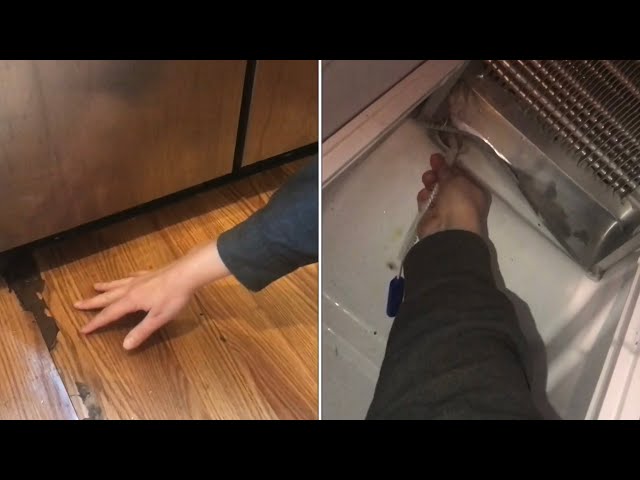
Finding water leaking from your Frigidaire side-by-side refrigerator can be alarming. Not only can it damage your flooring, but it also indicates a potential problem with your appliance. Water leaks are common occurrences, often appearing after defrost cycles or when the refrigerator is working harder to maintain its temperature. Addressing this promptly is essential to prevent further damage, mold growth, and wasted energy.
💡 Technical Key Takeaways:
- Core Focus: Diagnostic schematic and terminal connection layout for Frigidaire Refrigerator Side By Side Leaking Water.
- Target Scope: Field technicians, automotive DIYers, and residential/commercial electricians.
- Safety Rule: Always disconnect the primary power source/battery terminal and verify zero voltage with a multimeter before touching wires.
Common Causes of Frigidaire Refrigerator Side by Side Leaking Water
Here are several common reasons why your Frigidaire refrigerator might be leaking water:
- Clogged Defrost Drain: The defrost drain carries water away during the defrost cycle. If it gets blocked with ice or debris, water will overflow and leak.
- Frozen or Iced-Up Water Line: A frozen water line supplying the ice maker or water dispenser can cause leaks as the ice melts.
- Faulty Water Inlet Valve: This valve controls the flow of water to the ice maker and water dispenser. If it’s cracked or malfunctioning, it can leak.
- Cracked or Loose Water Filter Housing: A damaged filter housing or improper filter installation can result in water leaks.
- Leaky Ice Maker: Cracks in the ice maker itself, or a faulty fill valve, can cause leaks.
- Damaged Door Seals (Gaskets): Worn or torn door seals can allow warm air to enter, causing condensation and eventual water leaks.
- Condensation Issues: Excessive humidity in the refrigerator or outside can lead to condensation, especially in warmer climates.
- Overfilled Drip Pan: The drip pan at the bottom of the refrigerator collects water. If it’s full, it will overflow.
Symptoms Checklist
Use this checklist to help pinpoint the source of the leak:
- Puddle of water on the floor in front of the refrigerator.
- Water leaking from the bottom of the refrigerator.
- Ice buildup inside the freezer.
- Water stains or mold near the refrigerator.
- Reduced ice production or water dispensing issues.
- Unusual noises coming from the refrigerator.
How to Fix Frigidaire Refrigerator Side by Side Leaking Water Step-by-Step Guide
Follow these steps to troubleshoot and resolve the water leak:
- Unplug the Refrigerator: For safety, always unplug the refrigerator before beginning any troubleshooting.
- Locate the Defrost Drain: Typically, the defrost drain is located at the back of the freezer compartment, often behind a panel.
- Clear the Defrost Drain: Use a turkey baster with warm water, a long flexible wire, or a pipe cleaner to dislodge any blockage in the drain.
- Check the Water Line: Inspect the water line that supplies the ice maker for kinks, cracks, or ice buildup.
- Thaw a Frozen Water Line: If the water line is frozen, try thawing it with a hairdryer (on a low setting) or by wrapping it with warm towels.
- Inspect the Water Filter Housing: Remove the water filter and carefully inspect the housing for cracks or damage. Ensure the filter is properly installed.
- Examine the Door Seals: Check the refrigerator and freezer door seals (gaskets) for tears, cracks, or gaps. Clean them with warm soapy water.
- Empty the Drip Pan: Locate the drip pan (usually at the bottom or back of the refrigerator) and empty it. Ensure it’s properly positioned.
- Adjust Refrigerator Temperature: Make sure the refrigerator temperature isn’t set too low, as this can cause excessive condensation.
- Reduce Condensation: Avoid storing hot foods in the refrigerator and ensure food is properly sealed to reduce humidity.
- Check the Ice Maker: Visually inspect the ice maker for any cracks or signs of leaking.
- Clean the Condenser Coils: Dirty condenser coils can cause the refrigerator to work harder, leading to condensation. Clean them with a vacuum cleaner brush attachment.
- Reset the Refrigerator: After completing the checks, plug the refrigerator back in and monitor it for leaks. Sometimes, a simple reset can resolve minor issues.
- Monitor for Recurrence: Keep an eye on the refrigerator for a few days to ensure the leak doesn’t return.
Fix the Issue Without Buying Parts
Before resorting to replacing parts, try these free methods:
- Refrigerator Reset: Unplug the refrigerator for 30 minutes and then plug it back in. This can sometimes clear minor glitches.
- Thorough Cleaning: Clean the interior of the refrigerator, paying special attention to the defrost drain area.
- Inspect and Clean Door Seals: Clean the door seals with a damp cloth and check for any gaps or damage. A clean seal creates a tighter fit.
- Check for Proper Leveling: Ensure the refrigerator is level. An unlevel refrigerator can cause water to pool in certain areas.
- Ensure Proper Airflow: Don’t overcrowd the refrigerator, as this can restrict airflow and lead to condensation.
When Replacement Might Be Necessary
In some cases, replacement of certain parts may be necessary. Here are a few scenarios:
- Water Inlet Valve: If the valve is cracked or malfunctioning, replacement is often the best option. (Estimated cost: $30-$75)
- Water Filter Housing: A badly cracked housing will need replacement. (Estimated cost: $20-$60)
- Ice Maker Assembly: Extensive cracks or damage to the ice maker itself may require replacement. (Estimated cost: $100-$300)
- Door Seals (Gaskets): If the seals are severely damaged and cannot be cleaned or repaired, replacement is necessary. (Estimated cost: $40-$100 per seal)
Safety Warning
- Always unplug the refrigerator from the power outlet before performing any repairs.
- Be careful when handling electrical components.
- Wipe up any water spills immediately to prevent slips and falls.
- If you are uncomfortable with any of these steps, consult a qualified appliance repair technician.
Tools You May Need
- Screwdrivers (Phillips and flathead)
- Pliers
- Turkey baster
- Flexible wire or pipe cleaner
- Warm water
- Clean cloths
- Vacuum cleaner with brush attachment
- Hair dryer (optional)
FAQ
-
Q: Why is my refrigerator leaking after a power outage?
A: A power outage can cause ice to melt and refreeze, potentially blocking the defrost drain. Follow the steps to clear the drain. -
Q: How often should I replace my refrigerator water filter?
A: It is generally recommended to replace the water filter every 6 months. -
Q: Can a clogged water filter cause a leak?
A: Yes, a clogged water filter can increase pressure and cause leaks in the filter housing. -
Q: What if the water is leaking from the back of the refrigerator?
A: This often indicates a problem with the defrost drain or the water inlet valve. -
Q: How do I prevent future leaks?
A: Regularly clean the refrigerator, replace the water filter as recommended, and keep the door seals clean. -
Q: Is it safe to drink the water if the refrigerator has been leaking?
A: It is recommended to flush the water dispenser for several minutes after fixing the leak to ensure the water is clean.
Conclusion
Troubleshooting a leaking Frigidaire side-by-side refrigerator might seem daunting, but by following these steps, you can often identify and resolve the issue yourself. Remember to prioritize safety and take your time. Before calling a technician, try these solutions; you may be surprised at how easily you can fix the problem. If the leak persists or you are uncomfortable with any of the steps, don’t hesitate to seek professional help.
Youtube Video:
Quick Wiring Specifications & Terminal Guide
| Component / Circuit | Standard Wire Gauge | Recommended Protection |
|---|---|---|
| Control & Trigger Signals | 18 – 20 AWG | 5A – 7.5A Inline Fuse |
| Standard Auxiliary Load | 14 – 16 AWG | 15A – 20A Circuit Breaker |
| Main Power Feed / Supply | 10 – 12 AWG | 30A – 40A Heavy-Duty Relay |
Images References
Looking for more diagnostic guides? Explore our complete Refrigerator Problems 3 section for step-by-step troubleshooting solutions.
