
Introduction
A freezer that isn’t cold enough is a serious problem. It means your food isn’t being properly preserved, leading to spoilage and potential health risks. The evaporator coil is a key component responsible for cooling the freezer’s interior. When it fails to get cold, your freezer’s contents are at risk. This can happen suddenly, often after a power outage, or gradually, leaving you puzzled as to why your food is thawing. Addressing this issue promptly is crucial to save your groceries and prevent further damage to your appliance.
💡 Technical Key Takeaways:
- Core Focus: Diagnostic schematic and terminal connection layout for Freezer Evaporator Coil Not Getting Cold.
- Target Scope: Field technicians, automotive DIYers, and residential/commercial electricians.
- Safety Rule: Always disconnect the primary power source/battery terminal and verify zero voltage with a multimeter before touching wires.
Common Causes of Freezer Evaporator Coil Not Getting Cold
Here are some common reasons why your freezer’s evaporator coil might not be getting cold:
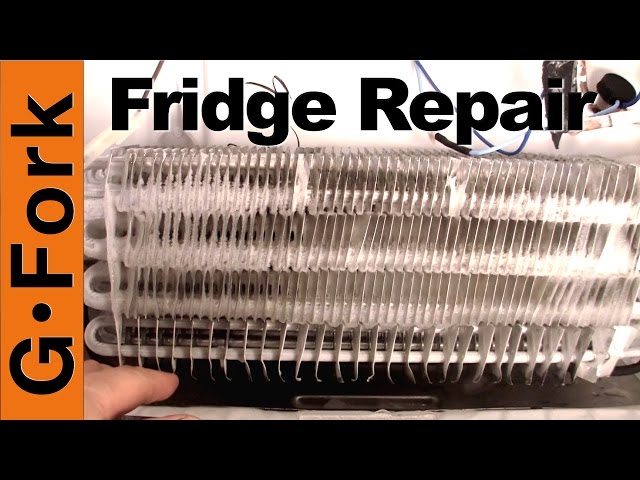
- Frost Buildup: Excessive frost can insulate the coils, preventing them from effectively cooling the freezer.
- Dirty Condenser Coils: Dust and debris on the condenser coils (usually on the back or bottom of the freezer) restrict heat release.
- Faulty Defrost Timer: If the defrost timer isn’t working correctly, the freezer might not defrost properly, leading to ice buildup.
- Defective Defrost Heater: A broken defrost heater won’t melt the frost accumulated on the evaporator coils.
- Bad Defrost Thermostat: This thermostat senses the temperature of the evaporator coil and signals the defrost heater to turn on. A faulty one prevents proper defrosting.
- Failed Compressor: The compressor is the heart of the freezer. If it fails, the refrigerant won’t circulate, and the evaporator coil won’t get cold.
- Refrigerant Leak: Low refrigerant levels mean the cooling system won’t work efficiently.
- Stuck or Faulty Evaporator Fan Motor: The evaporator fan circulates cold air throughout the freezer. If it’s not running, the freezer won’t cool evenly.
- Damaged Door Seal: A damaged seal allows warm air to enter, forcing the freezer to work harder and potentially causing ice buildup.
Symptoms Checklist
Check for these indicators to accurately diagnose the issue:
- Freezer temperature is warmer than usual.
- Food is thawing or not freezing properly.
- Excessive frost buildup on the back panel of the freezer.
- The freezer runs constantly without shutting off.
- The motor is running but the freezer isn’t cooling.
- You hear unusual noises, such as clicking or buzzing.
- The back panel inside the freezer feels warm instead of cold.
How to Fix freezer evaporator coil not getting cold Step-by-Step Guide
Follow these steps to troubleshoot and hopefully fix the problem:
- Unplug the Freezer: Safety first! Disconnect the freezer from the power outlet.
- Inspect the Door Seal: Check the rubber seal around the door for cracks, tears, or gaps. Clean it with warm, soapy water to remove any dirt or debris.
- Clean the Condenser Coils: Locate the condenser coils (usually on the back or bottom). Use a vacuum cleaner with a brush attachment to remove dust and debris.
- Check the Evaporator Fan: Open the freezer and listen for the evaporator fan running. If you don’t hear it, it may be stuck or faulty. Try gently spinning the fan blades with your finger. If it spins freely, the motor might be defective. If it’s obstructed by ice, proceed to the next steps to defrost.
- Manual Defrost: If you see excessive frost buildup, manually defrost the freezer. Remove all food, unplug the freezer, and leave the door open for 24-48 hours, or until all the ice melts. Place towels inside to absorb water.
- Inspect the Defrost Drain: Locate the defrost drain (usually at the bottom of the freezer compartment). Make sure it’s not clogged with ice or debris. Use a turkey baster or warm water to flush out any blockages.
- Check the Defrost Timer: The location of the defrost timer varies depending on the model. Typically, it’s a round dial located behind the freezer’s control panel. Turn the dial slowly until you hear a click. This forces the freezer into defrost mode. If the defrost heater turns on, the timer is likely working. If not, the timer may be faulty.
- Test the Defrost Heater: (Only if comfortable with basic electrical testing) After manually defrosting, and while the freezer is unplugged, locate the defrost heater near the evaporator coils. Use a multimeter set to ohms to test the heater for continuity. If it shows no continuity (an open circuit), the heater is faulty.
- Inspect the Wiring: Check all visible wiring connections inside the freezer compartment for any loose connections or damaged wires.
- Plug the Freezer Back In: After completing the above steps, plug the freezer back into the power outlet.
- Monitor the Freezer: Give the freezer several hours to cool down. Check the temperature periodically to see if it’s returning to normal.
- Adjust Temperature Settings: Make sure the temperature settings are correct. If the freezer is set too warm, it won’t cool properly.
- Rearrange Items: Make sure items are not blocking vents that are intended for optimal airflow throughout the freezer.
Fix the Issue Without Buying Parts
Before considering replacement parts, try these free methods:
- Freezer Reset: Unplug the freezer for 30 minutes and then plug it back in. This can sometimes reset the system and resolve minor issues.
- Thorough Cleaning: Clean the interior and exterior of the freezer, including the door seal and condenser coils.
- Temperature Recalibration: Consult your owner’s manual for instructions on recalibrating the temperature settings.
- Regular Inspection: Inspect the freezer regularly for frost buildup and clean the condenser coils every 6 months.
- Avoid Overloading: Don’t overload the freezer with too much food, as this can restrict airflow.
When Replacement Might Be Necessary
If the above steps don’t resolve the issue, certain components may need replacing. The compressor is the most expensive part to replace, ranging from $300-$700 (including labor). The defrost heater and defrost timer are less expensive, typically costing between $50-$200 each (including labor). A refrigerant leak is another costly repair, depending on the location and severity of the leak. Only consider replacement after exhausting all other troubleshooting steps.
Safety Warning
- Always unplug the freezer before performing any maintenance or repairs.
- Avoid working on electrical components if you are not comfortable or experienced.
- Keep the work area dry to prevent electric shock.
- Use caution when handling sharp tools or components.
- Consult a qualified technician if you are unsure about any step.
Tools You May Need
- Screwdrivers (Phillips and flathead)
- Vacuum cleaner with brush attachment
- Multimeter (for testing electrical components)
- Warm water and soap
- Towels
- Turkey baster
FAQ
Here are some frequently asked questions:
- Q: Why is my freezer running constantly? A: This could be due to frost buildup, dirty condenser coils, or a faulty thermostat.
- Q: How do I know if my defrost heater is working? A: After initiating a defrost cycle, feel the evaporator coils. They should warm up slightly if the heater is working. Alternatively, test with a multimeter.
- Q: What does a freezer evaporator coil do? A: The evaporator coil contains cold refrigerant that absorbs heat from inside the freezer, cooling the air.
- Q: Can I fix a refrigerant leak myself? A: No. Refrigerant leaks require specialized equipment and training. Contact a qualified technician.
- Q: How often should I defrost my freezer? A: Defrost your freezer when frost buildup exceeds inch.
- Q: My Freezer smells awful. What can I do? A: Remove all food and thoroughly clean the interior with a solution of baking soda and water. Leave the door open to air out the freezer.
Conclusion
Troubleshooting a freezer that isn’t getting cold can seem daunting, but by following these steps, you can often identify and resolve the issue yourself. Start with the simple solutions, such as cleaning and defrosting, and then move on to more complex checks. If you’ve exhausted all troubleshooting steps and the freezer still isn’t cooling, it’s time to call a qualified appliance repair technician. Don’t give up until you have exhausted every possible step!
Youtube Video:
Quick Wiring Specifications & Terminal Guide
| Component / Circuit | Standard Wire Gauge | Recommended Protection |
|---|---|---|
| Control & Trigger Signals | 18 – 20 AWG | 5A – 7.5A Inline Fuse |
| Standard Auxiliary Load | 14 – 16 AWG | 15A – 20A Circuit Breaker |
| Main Power Feed / Supply | 10 – 12 AWG | 30A – 40A Heavy-Duty Relay |
Images References
Looking for more diagnostic guides? Explore our complete Refrigerator Problems 2 section for step-by-step troubleshooting solutions.
