
Introduction
Discovering water pooling around your Maytag front-load washer can be frustrating and worrying. A leaking washer can damage your floors, promote mold growth, and even be a safety hazard. This guide is designed to help you pinpoint the cause of the leak and walk you through steps to resolve it. Leaks often occur during the spin cycle, or when the washer is filling. Addressing the problem promptly can save you money on repairs and prevent further damage to your home. Explore more in our Washing Machine Problems 4 collection.
💡 Technical Key Takeaways:
- Core Focus: Diagnostic schematic and terminal connection layout for Maytag Washer Leaking From Front Door.
- Target Scope: Field technicians, automotive DIYers, and residential/commercial electricians.
- Safety Rule: Always disconnect the primary power source/battery terminal and verify zero voltage with a multimeter before touching wires.
Common Causes of Maytag Washer Leaking From Front Door
Several factors can contribute to a Maytag washer leaking from the front door:
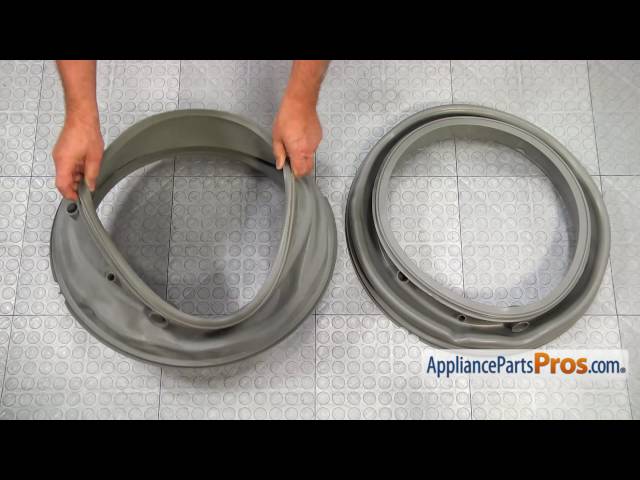
- Worn Door Seal (Gasket): This rubber seal creates a watertight barrier between the drum and the door. Over time, it can crack, tear, or become brittle.
- Debris on the Seal: Lint, hair, and small objects (like socks) can get caught between the seal and the door, creating gaps for water to escape.
- Improper Loading: Overloading the washer or unevenly distributing clothes can cause the drum to shift during the spin cycle, putting stress on the door seal.
- Damaged Door Latch: A faulty latch may not fully secure the door, preventing a tight seal.
- Clogged Drain Pump Filter: A clogged filter can cause water to back up and leak from the front of the machine.
- Excessive Detergent: Using too much detergent can create excessive suds that overflow and leak from the door.
- Loose or Damaged Hoses: The hoses connecting to the water inlet valve or drain pump could be loose, cracked, or damaged. While not directly at the door, the water can travel.
- Washer Not Level: An unlevel washer can vibrate excessively, stressing the door seal and other components, leading to leaks.
Symptoms Checklist
Confirm the leak and identify contributing factors:
- Water pooling on the floor in front of the washer.
- Water dripping from the bottom of the door during a cycle.
- Water leaking only during the spin cycle.
- Visible damage or debris on the door seal.
- The washer vibrating excessively during operation.
- Error codes appearing on the washer display.
- The door not latching properly.
How to Fix Maytag Washer Leaking From Front Door Step-by-Step Guide
- Safety First: Unplug the washer from the power outlet before beginning any troubleshooting steps.
- Inspect the Door Seal (Gasket): Carefully examine the entire rubber seal around the door opening. Look for cracks, tears, mold, or debris.
- Clean the Door Seal: Use a damp cloth with mild soap and water to thoroughly clean the seal. Remove any lint, hair, or other debris. A toothbrush can help get into crevices.
- Check for Obstructions: Feel around the inside edge of the seal and the door itself for any trapped objects (e.g., coins, small items of clothing).
- Test the Door Latch: Ensure the door latch is engaging properly and that the door is closing tightly. The door should click firmly into place.
- Level the Washer: Use a level to check if the washer is sitting evenly on the floor. Adjust the leveling feet until the washer is perfectly level.
- Inspect the Drain Pump Filter: Locate the drain pump filter (usually at the bottom front of the washer). Open the access panel and carefully remove the filter. Clean any lint, debris, or obstructions.
- Reduce Detergent Usage: Try using less detergent, especially if you have soft water. High-Efficiency (HE) detergent is recommended for these machines.
- Run a Cleaning Cycle: Many Maytag washers have a cleaning cycle designed to remove buildup and residue. Run this cycle regularly using a washer cleaner.
- Check the Drain Hose: Make sure the drain hose is properly connected and not kinked or damaged.
- Run a Test Cycle: After completing the above steps, run a small load of laundry to see if the leak is resolved.
- Observe Carefully: Watch the door area closely during the test cycle to pinpoint the exact location of any remaining leaks.
Fix the Issue Without Buying Parts
Often, you can resolve a Maytag washer leak without needing to replace any parts:
- Reset the Washer: Unplug the washer for 5 minutes and then plug it back in. This can sometimes reset the electronic controls and resolve minor glitches.
- Regular Cleaning: Clean the door seal and run the cleaning cycle regularly to prevent buildup and maintain optimal performance.
- Proper Loading Practices: Avoid overloading the washer and distribute clothes evenly inside the drum.
- Inspect Hoses Regularly: Check the water inlet and drain hoses for any signs of leaks, cracks, or damage.
When Replacement Might Be Necessary
If the leak persists after trying the above steps, a worn door seal may require replacement. A new door seal typically costs between $50 and $150, depending on the Maytag model. If the door latch is damaged, replacing the latch is also a possibility, with parts ranging from $30-$80. Hiring a technician to perform the replacement can add an additional $100-$200 to the total cost. For more related activities, check out our Lg Washer Stop Cycle And Drain.
Safety Warning
- Always unplug the washer from the power outlet before attempting any repairs.
- Be cautious when working with water and electrical components.
- Wear gloves to protect your hands from dirt and grime.
- Clean up any spills immediately to prevent slips and falls.
Tools You May Need
- Screwdriver (Phillips and flathead)
- Pliers
- Adjustable wrench
- Level
- Damp cloth
- Mild soap
- Toothbrush
- Bucket (for catching water)
FAQ
Q: Why is my washer only leaking during the spin cycle?
A: The spin cycle involves high speeds and increased water pressure, which can exacerbate existing weaknesses in the door seal or other components. Discover more free resources across our collection library.
Q: How often should I clean the door seal?
A: It is recommended to clean the door seal at least once a month, or more frequently if you notice buildup or debris.
Q: Can I use bleach to clean the door seal?
A: While diluted bleach can be used carefully, it’s best to use mild soap and water to avoid damaging the rubber seal. Ensure the seal is rinsed and dried properly.
Q: My washer is still leaking after cleaning the door seal. What else can I try?
A: Double-check that the washer is level, the drain pump filter is clean, and that you are not using excessive detergent. If the leak persists, the door seal may be worn and require replacement.
Conclusion
Troubleshooting a Maytag washer leak can seem daunting, but by following these steps, you can often identify and resolve the problem yourself. Start with the easy fixes first, like cleaning and leveling. If the leak continues, consider that a failing seal or latch may be the culprit. Don’t hesitate to consult a qualified appliance technician if you’re uncomfortable performing any of these repairs yourself. Getting the washer repaired sooner saves your floors and prevents mold growth. Good luck!
Youtube Video:
Quick Wiring Specifications & Terminal Guide
| Component / Circuit | Standard Wire Gauge | Recommended Protection |
|---|---|---|
| Control & Trigger Signals | 18 – 20 AWG | 5A – 7.5A Inline Fuse |
| Standard Auxiliary Load | 14 – 16 AWG | 15A – 20A Circuit Breaker |
| Main Power Feed / Supply | 10 – 12 AWG | 30A – 40A Heavy-Duty Relay |
