Introduction
Finding water underneath your refrigerator can be alarming and create a potential hazard in your kitchen. This issue is more common than you might think, and it’s usually caused by a few simple problems. Whether you’ve noticed a small puddle or a significant amount of water, it’s crucial to address it quickly. Ignoring the problem could lead to water damage to your flooring, mold growth, or even damage to the refrigerator itself. This guide will walk you through the most common causes of water leaks, how to troubleshoot the problem, and simple fixes you can try before calling a professional.
Common Causes of Water Underneath Refrigerator
Here are some of the most frequent reasons for water accumulating under your refrigerator:
- Defrost Drain Clog: This is the most common cause. The defrost drain carries away water from the defrost cycle. If it’s clogged with food particles or debris, the water will overflow and leak.
- Water Line Leak: If your refrigerator has an ice maker or water dispenser, a leak in the water line (usually plastic or copper) is a possible culprit.
- Water Filter Housing Leak: A loose or cracked water filter housing can also cause leaks.
- Ice Maker Issues: Problems with the ice maker itself, such as a faulty valve or a frozen fill tube, can lead to water overflow.
- Condensation Issues: High humidity levels can cause condensation to form on the outside of the refrigerator, which then drips onto the floor.
- Drip Pan Overflow: The drip pan catches water from the defrost cycle. If it’s full or cracked, it will overflow.
- Loose Water Connections: The connections to the water valve or dispenser may be loose causing water leaks.
- Door Seal Problems: A damaged or worn-out door seal can allow warm, moist air into the refrigerator, causing excessive condensation and water accumulation.
Symptoms Checklist
Use this checklist to help pinpoint the problem:
- Water appears to be coming from the front of the refrigerator.
- Water appears to be coming from the back of the refrigerator.
- The water only appears when the refrigerator is running.
- The water appears to be clean and clear.
- The water appears to have a slightly foul odor.
- The ice maker is not producing ice, or the ice is clumping together.
- The water dispenser is not working, or it’s dripping.
- You can hear a dripping sound coming from inside the refrigerator.
- You’ve recently replaced the water filter.
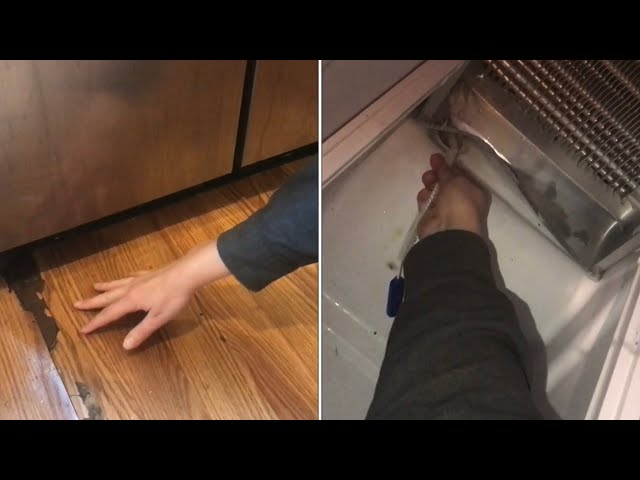
How to Fix Water Underneath Refrigerator Step-by-Step Guide
Follow these steps to troubleshoot and fix the water leak:
- Safety First: Unplug the refrigerator from the power outlet before starting any repairs.
- Locate the Source: Carefully observe where the water is coming from. Use a flashlight to get a better view.
- Check the Defrost Drain: Locate the defrost drain inside the freezer, usually at the back wall. It’s often a small hole or tube.
- Clear the Defrost Drain: Use a turkey baster, a long pipe cleaner, or a stiff wire to gently clear any blockage in the drain. You can also pour warm water down the drain to help melt any ice.
- Inspect the Water Line: Check the water line that connects to the refrigerator for any signs of leaks, cracks, or kinks.
- Tighten Connections: If you find a loose connection, tighten it carefully with a wrench. Be careful not to overtighten.
- Check the Water Filter Housing: Inspect the water filter housing for cracks or leaks. Make sure the filter is properly installed and tightened.
- Inspect the Ice Maker: Look for ice buildup around the ice maker. If there’s excessive ice, the fill tube might be frozen. Try defrosting the ice maker with a hairdryer on a low setting (carefully!).
- Check the Drip Pan: Locate the drip pan, usually at the bottom of the refrigerator, behind the kick plate. Remove the pan and empty any water. Inspect the pan for cracks or damage.
- Clean the Drip Pan: Clean the drip pan thoroughly with soap and water to remove any mold or mildew.
- Check the Door Seal: Inspect the refrigerator door seal for any signs of damage, such as tears or cracks.
- Clean the Door Seal: Clean the door seal with a mild soap and water solution. Make sure it’s properly sealed when the door is closed.
- Level the Refrigerator: An uneven refrigerator can cause water to pool in certain areas. Use a level to ensure the refrigerator is properly leveled. Adjust the leveling feet as needed.
- Plug it in and Monitor: After completing the above steps, plug the refrigerator back in and monitor it for a few hours to see if the leak has stopped.
Fix the Issue Without Buying Parts
Often, you can resolve the water leak without buying any new parts:
- Refrigerator Reset: Sometimes, simply unplugging the refrigerator for 15-20 minutes and then plugging it back in can reset the system and resolve minor issues.
- Deep Cleaning: Clean all interior surfaces of the fridge, paying attention to areas prone to condensation.
- Defrost Cycle Check: Manually trigger the defrost cycle (refer to your refrigerator’s manual) to ensure it’s functioning correctly.
- Humidity Control: If condensation is the problem, adjust the humidity control settings in your refrigerator to reduce moisture buildup.
- Proper Air Circulation: Avoid overpacking the refrigerator. Proper airflow helps prevent condensation.
When Replacement Might Be Necessary
In some cases, a replacement part might be needed:
- Cracked Drip Pan: If the drip pan is cracked beyond repair, it needs to be replaced (estimated cost: $20-$50).
- Damaged Water Line: If the water line is severely damaged or leaking despite tightening, it needs to be replaced (estimated cost: $15-$40).
- Faulty Water Valve: A malfunctioning water valve that continues to leak even when the refrigerator isn’t in use needs to be replaced (estimated cost: $40-$80).
- Worn Door Seal: A severely damaged door seal that doesn’t seal properly should be replaced (estimated cost: $30-$70).
Safety Warning
Follow these safety precautions while troubleshooting:
- Always unplug the refrigerator from the power outlet before starting any repairs.
- Avoid working on electrical components with wet hands.
- Be careful when handling sharp tools or wires.
- Wipe up any spilled water immediately to prevent slips and falls.
Tools You May Need
Here’s a list of tools that might come in handy:
- Screwdriver (Phillips and flathead)
- Wrench
- Flashlight
- Turkey baster or pipe cleaner
- Bucket or container
- Towels
- Level
FAQ
Here are some frequently asked questions:
- Why is my refrigerator leaking even after I cleared the defrost drain? There might be a crack in the drain pan or a leak in the water line. Double-check these components.
- How often should I clean the drip pan? Clean the drip pan every 6 months, or more frequently if you notice any buildup.
- How do I know if my water filter is causing the leak? Remove the water filter and see if the leaking stops. If it does, replace the water filter with a new one.
- What if I can’t find the defrost drain? Refer to your refrigerator’s owner’s manual for the location of the defrost drain.
Conclusion
Finding water underneath your refrigerator can be frustrating, but with a little patience and this guide, you can often identify and fix the problem yourself. By following these steps, you can save yourself the cost of a service call and prevent potential water damage to your home. If you’ve tried these troubleshooting steps and the leak persists, it’s best to consult with a qualified appliance repair technician for further assistance.
Youtube Video:
Looking for more useful options?
Check out recommended resources that others find helpful.