Introduction
Discovering water leaking from your Amana refrigerator can be a frustrating and potentially damaging situation. A leaking fridge not only creates a slippery hazard but can also lead to water damage to your flooring and surrounding cabinets. It’s a problem that needs to be addressed promptly to prevent further complications and keep your kitchen safe and dry. Whether you’ve noticed a small puddle accumulating at the base of the refrigerator, water dripping from the interior, or condensation building up excessively, this guide will help you diagnose the cause and walk you through the steps to fix it. Let’s get started!
Common Causes of Amana Refrigerator Leaking Water
Here are some common culprits behind a leaky Amana refrigerator:
- Clogged Defrost Drain: This is the most frequent cause. Ice buildup can block the drain, causing water to overflow.
- Frozen or Iced-Up Water Line: If your refrigerator has an ice maker or water dispenser, the water line might be frozen.
- Loose Water Line Connection: Check the connections to the water line for any leaks or looseness.
- Cracked or Damaged Water Filter Housing: A cracked filter housing can leak water when the filter is used.
- Full or Misplaced Drip Pan: The drip pan located at the bottom of the fridge, is designed to catch condensation. If full or dislodged, it can overflow.
- Faulty Water Inlet Valve: This valve controls the water flow to the ice maker and dispenser. A faulty valve can leak.
- Door Seal Issues: A damaged or dirty door seal (gasket) can let warm air in, causing excessive condensation.
- Incorrect Temperature Setting: Setting the temperature too low can lead to excessive frost buildup, which melts and leaks.
- Condenser Coils: Dirty condenser coils can cause the refrigerator to work harder, leading to condensation.
Symptoms Checklist
Use this checklist to accurately identify the issue:
- Puddle of water at the base of the refrigerator.
- Water dripping from inside the refrigerator.
- Excessive condensation inside the refrigerator.
- Ice buildup in the freezer or around the defrost drain.
- Water stains on the floor around the refrigerator.
- Water leaking from the water filter area.
- Unusual noises coming from the refrigerator.
- The refrigerator is not cooling efficiently.
How to Fix Amana Refrigerator Leaking Water Step-by-Step Guide
Follow these steps to troubleshoot and fix the leak:
- Unplug the Refrigerator: For safety, disconnect the refrigerator from the power outlet before starting any repairs.
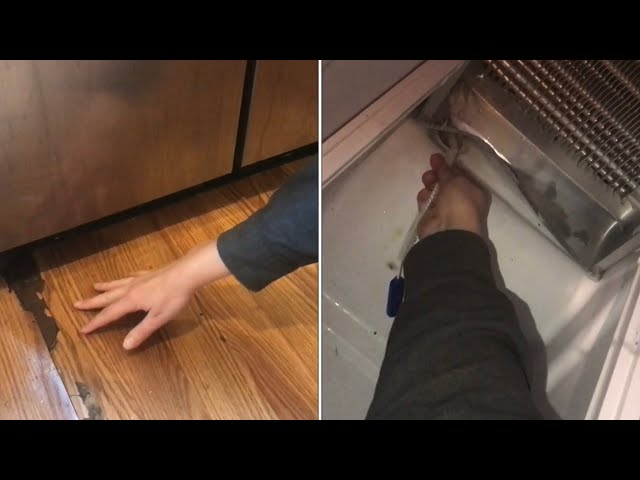
- Locate the Defrost Drain: It’s usually found on the back wall of the freezer compartment, near the bottom.
- Check for Ice Buildup: Examine the defrost drain for ice blockage. If there is ice, proceed to the next step.
- Melt the Ice Buildup: Use a hair dryer (on low setting) to gently melt the ice. Avoid using sharp objects that could damage the drain. Alternatively, pour warm (not hot) water down the drain.
- Clear the Drain: Once the ice has melted, use a flexible wire (like a pipe cleaner or a piece of stiff wire) to clear any remaining debris from the drain. Push it gently down the drain to dislodge any clogs.
- Flush the Drain: Pour a cup of warm water down the drain to ensure it’s completely clear. Check if the water flows freely into the drain pan underneath the refrigerator.
- Check the Water Line Connections: Locate the water line at the back of the refrigerator. Check all connections for tightness. Tighten any loose connections with a wrench, but be careful not to overtighten.
- Inspect the Water Filter Housing: If your refrigerator has a water filter, examine the filter housing for any cracks or damage. If you notice any damage, the housing will need to be replaced.
- Examine the Door Seals: Check the refrigerator and freezer door seals (gaskets) for any tears, cracks, or dirt buildup. Clean the seals with warm soapy water and a soft cloth. Ensure they create a tight seal when the door is closed.
- Check the Drip Pan: Locate the drip pan (usually at the bottom-back of the refrigerator). Remove it and check if it’s full. If so, empty it. Ensure the pan is properly positioned when you replace it.
- Adjust Temperature Settings: Ensure the refrigerator and freezer temperature settings are not too low. Recommended settings are around 37F (3C) for the refrigerator and 0F (-18C) for the freezer.
- Clean the Condenser Coils: Locate the condenser coils (usually at the back or bottom of the refrigerator). Use a vacuum cleaner with a brush attachment to clean the coils. This helps improve cooling efficiency.
- Monitor for Leaks: Plug the refrigerator back in and monitor for any further leaks. It may take a few hours to determine if the issue is resolved.
Fix the Issue Without Buying Parts
Many leaks can be resolved with simple maintenance:
- Reset: Unplugging the refrigerator for 30 minutes can sometimes reset the system and resolve minor issues.
- Cleaning: Regularly cleaning the interior of the refrigerator and the door seals can prevent condensation.
- Inspection: Periodically inspect the water lines and connections for any signs of wear or leaks.
- Maintenance: Clean the condenser coils every 6 months to ensure efficient cooling.
When Replacement Might Be Necessary
If the leak persists after trying the above steps, or if you find significant damage to internal components, replacement of certain parts might be necessary. Commonly failing parts include the water inlet valve ($30-$70 USD), the water filter housing ($20-$50 USD), or the defrost heater ($40-$80 USD). In rare cases, a complete refrigerator replacement may be required, costing anywhere from $500 to $2000+ USD depending on the model.
Safety Warning
- Always unplug the refrigerator before performing any repairs.
- Be careful when working with water and electricity to avoid electric shock.
- Clean up any spills immediately to prevent slips and falls.
- Do not use sharp objects to remove ice buildup as this could damage the appliance.
Tools You May Need
Heres a basic list of tools you might find helpful:
- Screwdrivers (Phillips and flathead)
- Adjustable wrench
- Pliers
- Vacuum cleaner with brush attachment
- Hair dryer
- Flexible wire or pipe cleaner
- Soft cloth or sponge
FAQ
Here are some frequently asked questions about refrigerator leaks:
-
Q: Why is my Amana refrigerator leaking from the bottom?
A: This is often due to a clogged defrost drain or a full drip pan. -
Q: How do I unclog the defrost drain?
A: Use a hair dryer to melt any ice and then clear the drain with a flexible wire. -
Q: What if the water line is leaking?
A: Check the connections for tightness and replace any damaged parts. -
Q: How often should I clean the condenser coils?
A: Clean the condenser coils every 6 months to ensure efficient cooling.
Conclusion
Troubleshooting a leaking Amana refrigerator might seem daunting at first, but by following these steps, you can often identify and fix the issue yourself. Remember to prioritize safety and take your time. If youve tried these methods and the leak persists, it might be time to consult a qualified appliance repair technician. Good luck!
Youtube Video:
Looking for more useful options?
Check out recommended resources that others find helpful.