Introduction
Discovering water leaking from your Frigidaire FFHS2611PFEA refrigerator can be concerning. This water can damage your floors, create a slip hazard, and even indicate a more serious problem with your appliance. Leaks often happen after a defrost cycle, when water lines freeze, or when components become clogged. Addressing this promptly can save you money on repairs and prevent further damage to your home.
Common Causes of Frigidaire FFHS2611PFEA Leaking Water
Here are some of the most common reasons why your refrigerator might be leaking:
- Clogged Defrost Drain: Ice buildup can block the drain, causing water to overflow and leak.
- Frozen Water Line: If the water line supplying your ice maker freezes, it can crack and leak when it thaws.
- Cracked or Loose Water Line: The plastic water lines can become brittle and crack over time.
- Defective Water Inlet Valve: This valve controls the water flow to the ice maker and water dispenser. A faulty valve may leak.
- Damaged Water Filter Housing: If the housing is cracked or the filter is not properly installed, water can leak.
- Full or Misaligned Drip Pan: The drip pan under the refrigerator can overflow if it’s not properly positioned or if there’s excessive water.
- Loose or Worn Door Seals: This allows warm air to enter, causing condensation and potential leaks.
- High Humidity: In humid environments, condensation can form on the refrigerator’s exterior and drip down.
Symptoms Checklist
Use this checklist to accurately identify the source of the leak:
- Water pooling under the refrigerator.
- Water dripping from the bottom of the freezer compartment.
- Ice buildup inside the freezer.
- Water stains on the floor near the refrigerator.
- Ice maker not working properly or producing less ice.
- Water dispenser dripping or leaking.
How to Fix Frigidaire FFHS2611PFEA Leaking Water Step-by-Step Guide
Follow these steps to troubleshoot and fix the leak:
- Unplug the Refrigerator: Before starting any repairs, unplug the refrigerator from the power outlet to prevent electrical shock.
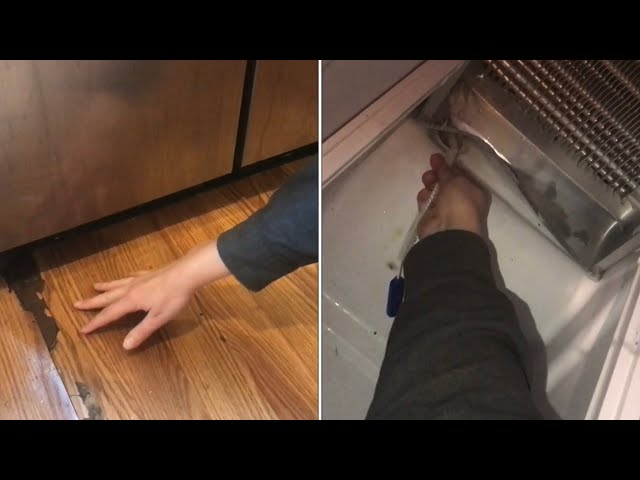
- Locate the Defrost Drain: It’s usually located on the back wall of the freezer compartment, often behind a panel. Consult your owner’s manual for the exact location.
- Melt Ice in the Drain: Use a hair dryer (on a low setting) to gently melt any ice blocking the drain. Alternatively, pour warm water down the drain. Do not use sharp objects, as they can damage the drain.
- Flush the Drain: Use a turkey baster or syringe to flush the drain with warm water. This will help clear any remaining debris.
- Check the Water Line: Inspect the water line running to the refrigerator for any cracks or kinks. Ensure the fittings are tight.
- Inspect the Water Filter: Remove and reinstall the water filter, making sure it’s properly seated. Check the filter housing for any cracks.
- Examine the Drip Pan: Locate the drip pan (usually under the refrigerator) and empty it. Make sure it’s properly positioned.
- Clean the Door Seals: Clean the door seals with a damp cloth to remove any dirt or debris. This will ensure a tight seal.
- Check for Condensation: Wipe down any condensation on the outside of the refrigerator. Ensure the refrigerator is not overcrowded, as this can contribute to condensation.
- Monitor the Refrigerator: Plug the refrigerator back in and monitor it for any leaks. It may take a few hours for the leak to reappear, especially if caused by defrost cycles.
- Check the Water Inlet Valve: The water inlet valve is usually located at the back of the refrigerator. Inspect it for any signs of leaks or damage. If you see water coming from the valve itself, it might be faulty.
Fix the Issue Without Buying Parts
Before considering replacements, try these free methods:
- Reset the Refrigerator: Unplug the refrigerator for 5-10 minutes and then plug it back in. This can sometimes resolve minor issues.
- Cleaning: Regularly clean the interior of your refrigerator to prevent food buildup and condensation.
- Inspection: Periodically inspect the water lines, door seals, and drip pan for any signs of damage or wear.
- Maintenance: Replace the water filter every 6 months to prevent clogs and ensure proper water flow.
When Replacement Might Be Necessary
If the leak persists after trying the above steps, a replacement part might be needed. Common parts that fail and cause leaks include:
- Water Inlet Valve: (Estimated cost: $30-$70)
- Water Filter Housing: (Estimated cost: $20-$50)
- Water Line: (Estimated cost: $10-$30)
Consider consulting a qualified appliance repair technician for diagnosis and part replacement.
Safety Warning
- Always unplug the refrigerator before attempting any repairs.
- Be careful when using a hair dryer to melt ice. Avoid overheating the area.
- Wipe up any spills immediately to prevent slips and falls.
- If you are not comfortable working with electrical appliances, consult a qualified technician.
Tools You May Need
- Screwdrivers (Phillips and flathead)
- Pliers
- Turkey baster or syringe
- Hair dryer
- Adjustable Wrench
- Towels
FAQ
- Why is my refrigerator leaking after a defrost cycle? The defrost cycle melts ice buildup, and if the drain is clogged, the water overflows.
- How often should I replace my water filter? Every 6 months is generally recommended.
- Can a full refrigerator cause leaks? Overcrowding can restrict airflow and lead to condensation, potentially causing leaks.
- What if the drain is completely frozen and I can’t melt it with a hair dryer? You can try using a steamer, but be very careful not to melt any plastic parts.
- My water dispenser is leaking. Is that related to the leak underneath the fridge? Possibly. A leak in the dispenser’s water line inside the fridge or at the water inlet valve can sometimes appear as water underneath the appliance.
Conclusion
Troubleshooting a leaking refrigerator can seem daunting, but by following these steps, you can often identify and fix the problem yourself. Remember to prioritize safety and take your time. If the leak persists or you are uncomfortable performing the repairs, don’t hesitate to contact a qualified appliance repair technician. Good luck!
Youtube Video:
Looking for more useful options?
Check out recommended resources that others find helpful.