Introduction
Discovering a pool of water in front of your Whirlpool refrigerator is a common household issue that can be quite alarming. Not only is it inconvenient, but it can also lead to slippery floors, potential water damage to your flooring, and even mold growth if left unchecked. Leaks usually indicate an underlying problem that needs to be addressed promptly. This guide will walk you through the most common causes and how to troubleshoot them, so you can get your refrigerator back to normal and avoid costly repairs. Addressing the leak quickly can prevent further damage and maintain a healthy home environment.
Common Causes of Whirlpool Refrigerator Leaking Water on Floor
Here are the most frequent reasons why your Whirlpool refrigerator might be leaking:
- Clogged Defrost Drain: This is the most common culprit. Ice builds up in the freezer, and when it melts during the defrost cycle, the water can’t drain properly, causing it to overflow.
- Frozen Water Line: If your refrigerator has an ice maker or water dispenser, the water line can freeze, especially if the freezer temperature is set too low. When the ice melts, it leaks.
- Loose or Damaged Water Line Connection: The connections to the water line behind the refrigerator can loosen or crack over time, leading to leaks.
- Cracked or Damaged Drain Pan: Located at the bottom of the refrigerator, the drain pan collects water from the defrost cycle. If it’s cracked, the water will leak out.
- Faulty Water Inlet Valve: This valve controls the flow of water to the ice maker and water dispenser. If it’s malfunctioning, it can leak even when the ice maker isn’t in use.
- Leaking Water Filter Housing: If your refrigerator has a water filter, the housing can crack or the filter itself might not be properly installed, leading to leaks.
- Damaged Door Seal: A worn-out or damaged door seal can allow warm air to enter the refrigerator, causing condensation and eventual leaks.
- Overfilled Ice Maker: An ice maker that’s producing too much ice can overflow, leading to water on the floor.
Symptoms Checklist
These indicators can help you identify the source of the leak:
- Puddle of water in front of the refrigerator.
- Ice buildup in the freezer.
- Water dripping from the freezer compartment.
- Water stains on the floor near the refrigerator.
- Visible cracks or damage to the drain pan.
- Water accumulating under the crisper drawers.
- Ice maker not working properly or overflowing.
- Water dispenser not working or dripping.
How to Fix Whirlpool Refrigerator Leaking Water on Floor Step-by-Step Guide
- Unplug the Refrigerator: For safety, always unplug the refrigerator before starting any troubleshooting.
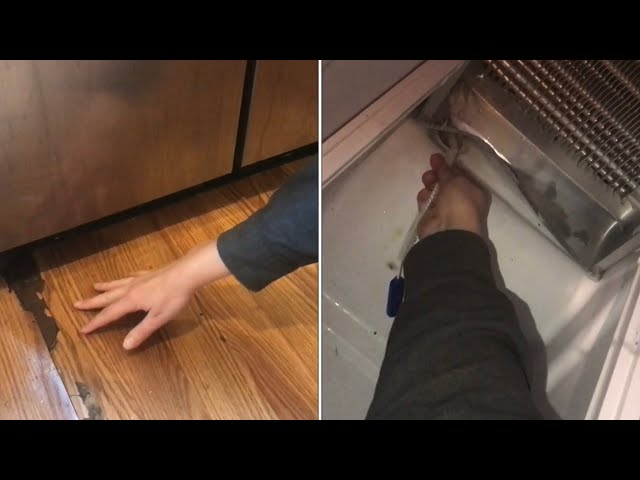
- Locate the Defrost Drain: This is usually located on the back wall of the freezer compartment, often behind a panel.
- Melt Any Ice Buildup: Use a hairdryer on a low setting to melt any ice blocking the drain. Be careful not to melt any plastic components.
- Clear the Drain: Use a turkey baster or a long, flexible object like a pipe cleaner or a piece of sturdy wire to clear any debris from the drain. Hot water can also help flush it out.
- Check the Drain Pan: Locate the drain pan (usually at the bottom of the refrigerator, either in the front or the back). Remove it and inspect it for cracks or damage.
- Inspect Water Line Connections: If your refrigerator has an ice maker or water dispenser, check the water line connections behind the refrigerator for any leaks or loose fittings. Tighten any loose connections.
- Check the Water Filter Housing: If your refrigerator has a water filter, inspect the housing for cracks or leaks. Make sure the filter is properly installed and securely in place.
- Examine the Door Seal: Inspect the door seal around the refrigerator and freezer doors. Look for any tears, cracks, or gaps. Clean the seal with a damp cloth to remove any debris.
- Adjust the Temperature Settings: Ensure the freezer temperature is not set too low, as this can cause the water line to freeze. A setting of around 0F (-18C) is usually ideal.
- Monitor the Ice Maker: Observe the ice maker to see if it’s overfilling. If it is, try adjusting the ice maker settings or cleaning any ice buildup.
- Clean the Condenser Coils: Dust and dirt on the condenser coils can reduce the refrigerator’s efficiency, leading to temperature fluctuations and potential leaks. Clean the coils with a vacuum cleaner and a brush attachment. These coils are often on the back of the refrigerator, or accessible at the bottom.
- Reassemble and Plug-In: Once you’ve checked all the components, reassemble everything and plug the refrigerator back in.
- Monitor for Leaks: Keep an eye on the area in front of the refrigerator for any new leaks.
Fix the Issue Without Buying Parts
Before considering replacement parts, try these free methods:
- Reset the Refrigerator: Unplug the refrigerator for 10 minutes, then plug it back in. This can sometimes reset the system and resolve minor issues.
- Thorough Cleaning: Clean the interior of the refrigerator, paying attention to the back wall and the area around the defrost drain.
- Check Door Alignment: Make sure the refrigerator doors are aligned properly to ensure a tight seal.
- Regular Maintenance: Clean the condenser coils every 6 months to improve efficiency and prevent temperature fluctuations.
When Replacement Might Be Necessary
If you’ve tried all the troubleshooting steps and the leak persists, it might be time to consider replacing a part. Common parts that may need replacement include the defrost drain heater ($30-$60), the water inlet valve ($40-$80), or the drain pan ($20-$50). If the refrigerator is very old or the repair costs are significant, replacing the entire unit might be a more economical option. New refrigerators can range from $500 to $2000 or more, depending on the features and size.
Safety Warning
- Always unplug the refrigerator before performing any maintenance or repairs.
- Be careful when using a hairdryer to melt ice, as water and electricity can be dangerous.
- Wipe up any spills immediately to prevent slips and falls.
- If you’re uncomfortable performing any of these tasks, consult a qualified appliance repair technician.
Tools You May Need
- Screwdriver (Phillips and flathead)
- Turkey baster or flexible wire
- Hairdryer
- Wrench (for water line connections)
- Vacuum cleaner with brush attachment
- Towels
FAQ
- Why is my refrigerator leaking only sometimes? Leaks that occur intermittently often indicate a clogged defrost drain. The ice builds up over time and then melts, causing a temporary overflow.
- How often should I clean the condenser coils? Ideally, clean the condenser coils every 6 months to maintain optimal efficiency.
- Can a leaking refrigerator cause mold? Yes, prolonged water leaks can create a damp environment that encourages mold growth. Address leaks promptly to prevent this.
- Is it safe to use bleach to clean the defrost drain? While bleach can be effective, it’s best to use a solution of warm water and baking soda to avoid damaging the drain components.
Conclusion
Discovering a Whirlpool refrigerator leaking water on the floor can be frustrating, but with a methodical approach, you can often diagnose and fix the problem yourself. This guide provides a step-by-step process to help you troubleshoot common causes and implement effective solutions. Before calling a technician, try these DIY steps. You might be surprised at how much you can accomplish. A little effort can save you money and ensure your refrigerator runs smoothly for years to come.
Youtube Video:
Looking for more useful options?
Check out recommended resources that others find helpful.